Showing posts with label Food. Show all posts

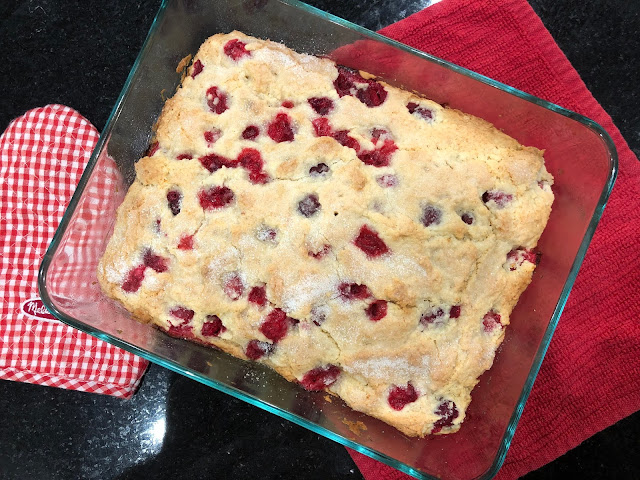
Cranberry Orange Buttermilk Breakfast Cake

Saturday, December 1, 2018

Breakfast cake...yum. Leading into late fall and winter, there is nothing more that I love (in the kitchen) than the delicious smells of home baked goods. Aside from anything involving cookies, or things with chocolate (favorites for obvious reasons), breakfast yummies are definitely high on the list at our house. This cranberry buttermilk coffee cake is d-e-licious. It is the perfect festive holiday treat if you are planning out Christmas morning, a holiday brunch gathering, or are someone who loves making food items to gift to friends and family (if you happen to be one of those...please come knocking on my door!)

Recipe adapted from Alexandra's Kitchen

CRANBERRY ORANGE BUTTERMILK BREAKFAST CAKE | Yield: 1 8x10 (3qt) baking dish (approximately 6-8 servings) | Total Time: 1hr

INGREDIENTS:

1/2 C unsalted butter, room temp 
Orange zest, 1 orange
3/4 C sugar + 1 Tbsp sugar
1 egg, room temp
1 tsp vanilla
2 C flour
2 tsp baking powder
1 tsp kosher salt
2 C fresh cranberries (1 bag)
1/2 C buttermilk

DIRECTIONS:

Preheat oven to 350 degrees.

Cream butter, 3/4 C sugar, orange zest in a large bowl until well blended. Add egg and vanilla. Mix until combined. 

In a separate bowl, whisk together flour, baking powder, and salt. Add flour mixture to the batter a little at a time, alternating with buttermilk.

In a separate smaller bowl, toss cranberries with 2 Tbsp flour to coat.

Fold cranberries into batter mix.

Spread batter into a greased baking dish (it will be very thick), and sprinkle with remaining 1 Tbsp sugar. Bake 45 min and check for doneness. Allow to cool 15 minutes before serving.


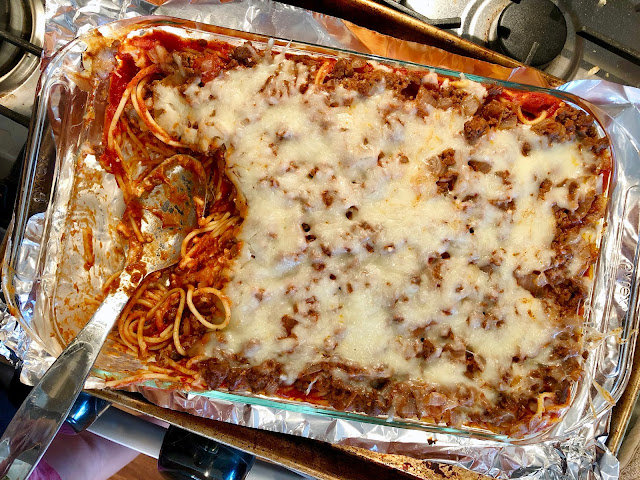
Million Dollar Spaghetti

Friday, September 14, 2018

RECIPE ALERT! I don't get around to making new dishes near as often as I once did, but when I find something worth sharing, I'll try to continue posting! Just after S was born, a friend of mine dropped off this Million Dollar Spaghetti for our family to enjoy, and I've been making it on repeat ever since. It is super easy, flavor wise...what I would call a take on 'easy lasagna', and incredibly filling (a.k.a....usually plenty of leftovers to stretch for a second meal - #winning in a house with three littles!). I hope you love it as much as we do!


Recipe slightly modified from Dinner Then Dessert

MILLION DOLLAR SPAGHETTI | Yield: 1 9x13 baking dish (approx. 9-12 servings) | Total Time: 1hr

*NOTE: If you don't want to eat this for a solid week, or don't have a large family to feed, I would suggest cutting this recipe in half!

INGREDIENTS:

1 lb spaghetti, cooked al dente* (or substitute your favorite pasta)
1 lb ground beef or sausage
1 medium onion, chopped
4 cloves garlic, minced
1/2 tsp salt
1/2 tsp pepper
6 C marinara sauce* (I use Newman's Own brand)
8 oz cream cheese, softened
3 C shredded mozzarella cheese
parsley, chopped (optional garnish)

DIRECTIONS:

Preheat oven to 350 degrees.

Brown beef/sausage together with onions, salt, and pepper. Drain any excess liquid, then add 1 C of marinara sauce. Stir to combine.

While browning the meat, in a separate pot, boil the pasta to al dente. Drain, transfer to a bowl, and add remaining 5 C marinara. Stir to combine.

In a separate small bowl, mix together cream cheese and 2 C mozzarella.

Transfer half the pasta/sauce to a 9x13 baking dish.

Top with the cream cheese mixture, and add the with remaining pasta/sauce mixture on top.

Spread the meat sauce on top of the pasta, and sprinkle with remaining 1 C mozzarella.

Cover and bake at 350 degrees for 30 minutes.

Uncover and bake for an additional 10 minutes, until cheese is melted.

Serving suggestions: breadsticks/garlic knots, Caesar salad, wine :)

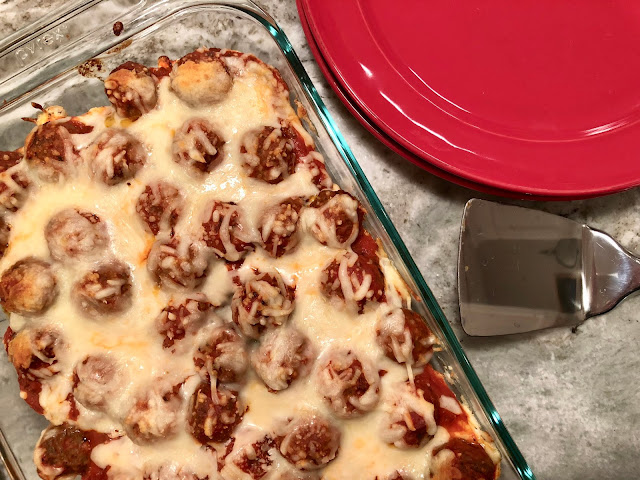
Meatball Sub Casserole

Thursday, February 8, 2018

Lately, I've been on the hunt for quick, easy meals as we prepare to add a new baby to our family this spring. If adding a newborn to the mix goes anything like the last two times, one of my biggest hurdles will be getting a meal on the table come dinnertime. If I'm honest, most of the time, I could just be content with popcorn, cereal, or a cold-meat sandwich after a long exhausting day chasing around our busy little boys, but T would be very much opposed to that plan as he typically doesn't eat anything until dinnertime. Alas, the hunt for the perfect mix of go-to quick dinner recipes is real. While cooking my way through several failed recipes from Pinterest, I stumbled across this one that was quite the opposite, and enjoyed by all. It is quick, semi-homemade, and super delicious.


Recipe from The Country Cook

MEATBALL SUB CASSEROLE | Yield: 1 9x13 pan | Total Time: 45 min

INGREDIENTS:

1 loaf Italian bread, cut into 1 inch slices
1 8oz package cream cheese, softened
1/2 C mayonnaise
1 tsp Italian seasoning
1/4 tsp pepper
2 C shredded mozzarella, divided
1 pkg fully cooked meatballs, thawed
1 28oz jar marinara sauce

DIRECTIONS:

Preheat oven to 350 degrees.

Slice Italian loaf, arrange in single layer on baking sheet. Toast under broiler on each side 1-2 minutes. WATCH CAREFULLY so it doesn't burn!

Arrange toasted Italian bread in a single layer in a 9x13 glass baking dish.

In a bowl, mix together cream cheese, mayonnaise, Italian seasoning, and pepper. Spread over toasted Italian loaf. (NOTE: You may have extra. Save it for another use.) Sprinkle with 1/2 C shredded mozzarella.

Mix together thawed meatballs and marinara sauce. Spoon over cheese. Top with remaining mozzarella.

Bake at 350 degrees for 30-35 minutes. Serve with salad!


Sausage Pepper Egg Bake

Wednesday, July 5, 2017

After many years of making the same tried and true ham egg and cheese breakfast casserole, I've been on the hunt for a great sausage alternative to throw into the mix. Finally, I ended up combining a couple of different recipes to find the perfect mix, and now am happy to say, I'm done looking! The great thing about this recipe is, there is a bit of zip to it, so no more bland casseroles, and it's heavy on the protein, so a great option to keep the boys in my life filled up for longer than an hour. Go ahead and double it, using a 9x13 if you are feeding a crowd!


SAUSAGE PEPPER EGG BAKE | Yield: 4-6 servings | Total Time: 1 hr

INGREDIENTS:

1 lb mild sausage, browned
1/2 bag frozen shredded o'brien hash browns, lightly browned
1 C cheddar cheese
1 red pepper, chopped
8 eggs
1 C milk
1/2 tsp salt
1/4 tsp pepper
1/8 tsp onion powder
1/8 tsp garlic powder

DIRECTIONS:

Preheat oven to 350 degrees.

In a large skillet, cook sausage until no longer pink. Transfer to a bowl.

Add hash browns to the skillet and cook until lightly brown. Put hash browns in the bottom of a lightly greased baking dish. Top with sausage, cheese, chopped red pepper.

Whisk together eggs, salt, pepper, garlic powder, onion powder and milk. Pour over hash brown mixture.

*Cover and refrigerate now if you are baking later.

Bake, uncovered, 40-45 minutes. Enjoy! P.S. --> Leftovers heat up great!


SaveSave
SaveSave

Orange Chicken with Butternut Squash Rice

Monday, November 7, 2016

You guys...I cooked a delicious meal last week that I am so excited to share with you. I feel like it is sooooo easy to get into a routine of the same few recipes over and over, so I decided to switch things up a bit. As I have mentioned before, our family has been enjoying Blue Apron meals on and off over the course of about the last six months or so. We took a step back over the summer when baby G arrived, but now that we have gotten somewhat settled into life as a family of four, I chose to update our Blue Apron meals to go from three meals a week for two people, to just two meals a week for four people. Leftovers are amazing to be able to pull out of the fridge on nights when a home cooked meal is about the furthest thing from my mind. Anyways...this recipe is a meal I choose not to order, but later decided to cook anyways using ingredients that I mostly had on hand already. I hope you love it as much as we did!


ORANGE CHICKEN WITH BUTTERNUT RICE | Yield: 4 servings | Time: 35-45min.

INGREDIENTS:

1 pkg chicken tenderloins
1 C jasmine rice
4 stalks celery
6 cloves garlic, minced
2 scallions
1 small butternut squash, diced (approx 2 cups)
3 Tbsp low sodium soy sauce
3 Tbsp orange marmalade
2 Tbsp sesame oil
1 Tbsp Sambal Oelek

Suggested side dish: Pagoda Chicken Egg Rolls

DIRECTIONS:

Wash and dry the fresh produce. Peel and mince garlic (if using fresh). Cut off the root end of the scallion; thinly slice on an angle, separating the white bottom and green top. Peel and medium dice the squash. Cut the celery on an angle into 1/2 inch wide slices.

In a medium pot, heat 2 tsp olive oil until hot. Add 3 cloves minced garlic and half the white bottom of scallion. Season with salt and pepper. Cook, stirring often, 1-2 minutes, or until softened. Add rice, a pinch of salt, and 1 1/2 C water. Bring to a boil, cover, and reduce heat to low for 14-16 minutes, or until the water has been absorbed. Remove from heat and fluff with a fork.

Meanwhile, in a large pan, heat 1 Tbsp olive oil over medium-high heat. Add diced squash, season with salt and pepper. Cook, stirring occasionally, for 6-7 minutes, or until softened. Add 1/2 the soy sauce; stir to coat, cook 2-3 minutes. Transfer to a plate.

While the rice is still cooking, in the same pan, heat 1/2 the sesame oil on medium-high heat. Add the celery, remaining garlic, season with salt and pepper. Cook 2-3 minutes, or until softened. Add 1/4 C water, stirring occasionally until water cooks off, 2-4 minutes. Transfer to a plate.

Pat the chicken tenders dry with a paper towel, and season both sides with salt and pepper. In the same pan, heat 1 Tbsp olive oil on medium-high heat. Add the chicken, cooking 3-4 minutes on each side until lightly browned. Add the orange marmalade, remaining white bottom of scallion, remaining soy sauce and sesame oil, 1/4 C water, and sambal oelek (adjust for how spicy you want your dish). Cook, stirring occasionally 2-3 minutes, or until chicken is cooked through. Add the celery, and continue cooking 1-2 minutes until sauce thickens.

Finish the rice by adding the cooking butternut squash to the rice. Stir to combine and season with salt and pepper to taste. Serve orange chicken over butternut rice. Garnish with green scallions. Enjoy!


Banana Walnut Bread

Tuesday, May 31, 2016

Nothing smells better in the morning than 1.) freshly baking banana bread and 2.) coffee. Am I right? This is certainly true in my kitchen as I've learned when T walks in the door after his morning rounds and his immediate reaction is to ask 'What are you are baking that smells so delicious?', and 'When will it be ready?' This from a man who rarely if ever chooses to eat before mid-afternoon. When it is finally ready, of course, he reverts to a child and has me cut him a couple slices, butter them up, and serve him. Completely helpless.


Recipe adapted from food.com
I've tried many different variations of banana breads...most of which have their own little twist on what makes them great. In this version, I'd like to think the key ingredient is cinnamon. If I didn't like bananas so much (no jokes, I usually incorporate at least one, sometimes two into my daily diet), I'd probably make this recipe on a weekly basis!

BANANA WALNUT BREAD | Yield: 1 loaf or 3 mini-loaves | Total Time: 1 hr. 15 min. OR 55 min. for mini-loaves

INGREDIENTS:

1/2 C butter, softened
3/4 C sugar
2 eggs
1/2 tsp vanilla
4 ripe bananas, mashed
1 1/2 C flour
1 tsp baking soda
1 tsp cinnamon
1/2 tsp salt
1/2 C chopped walnuts (optional)

DIRECTIONS:

Preheat oven to 350 degrees. In a large mixing bowl, add softened butter, sugar, eggs and vanilla. Stir until well combined. (OK to have some butter chunks).

In a small bowl (or the same bowl if you want less dishes like me), use a fork to mash bananas. Transfer bananas to the butter mixture, stir to incorporate.

Whisk together flour, baking soda, salt, and cinnamon. Add into the large mixing bowl, and stir until just combined. If using, fold in chopped walnuts. Butter or grease a 9 x 5 loaf pan (or 3 mini-loaf pans), and pour banana mixture inside. Sprinkle top with additional chopped walnuts if using, and bake (1 hr. for 9 x 5 loaf pan // 40 min. for mini-loaves). Check for doneness, and continue baking as needed.

Cool on wire rack and serve warm. Freezes well!

Apple Cinnamon Scones

Wednesday, October 21, 2015

You guys...I may have landed on the best fall pastry ever. I'm not joking. On a whim, I decided to whip up this recipe for Apple Cinnamon Scones, and I kid you not...they are maybe...ok yes they are... the best scone I've ever had. Think cinnamon roll flavors combined with fresh apples from the orchard. Yum. Yum. YUM.


Recipe from King Arthur Flour

APPLE CINNAMON SCONES | Yield: 12 scones | Total Time: 40 minutes

INGREDIENTS:

2 3/4 C unbleached all purpose flour
1/3 C sugar
3/4 tsp salt
1 Tbsp baking powder
1 tsp + 1/2 tsp Apple Pie Spice or ground cinnamon, divided
1 stick (8 Tbsp) cold butter, cubed
1 medium apple, diced (OK to leave on the skin)
3/4 C cinnamon chips
2 large eggs
1 tsp vanilla extract
1/2 C unsweetened apple sauce
3 Tbsp coarse turbinado sugar

DIRECTIONS:

Preheat oven to 425 degrees.

In a large food processor, add flour, sugar, salt, baking powder, and 1 tsp Apple Pie Spice. Pulse to combine. Add cubed butter, and pulse until everything is mixed together and crumbly. (NOTE: if you don't have a food processor, just use a pastry blender to cut in the butter.)

In a separate large bowl, whisk together apple sauce, vanilla, and eggs. Add dry mixture from food processor, to bowl, and stir until moistened. Gently fold in diced apple and cinnamon chips.

Line a baking sheet with parchment paper, and sprinkle with flour. (If you don't have parchment paper, just use an ungreased baking sheet). Divide dough into two equal parts on floured parchment, and form into two flattened circles about 6" wide and 3/4" thick. Use a pastry cutter to cut each circle into 6 wedges. Separate the wedges, brush with milk, and sprinkle with a mixture of 3 Tbsp coarse turbinado sugar, and 1/2 tsp Apple Pie Spice.

Bake at 425 degrees for 18-22 minutes, or until golden brown, and edges don't look wet or unbaked.

Serve warm...and try to stop yourself after just one!

Smoothie City

Monday, October 19, 2015

Lately, it has been smoothie city in our house. Over the summer, C learned how to drink from a straw, and after acquiring a couple new awesome sippy cups with straws, we've been indulging in many...many smoothies. 


 Not only are smoothies a healthy breakfast or snack option, but they're also great for cooling down on a hot day, and good for my peace of mind knowing that C is getting plenty of healthy fruits...and occasionally veggies...in his diet now that he's eating mostly table food. Typically, the table food he gets is reasonably healthy too, but he trends towards favoriting the bread, pasta, crackers, and cheese rather than the antioxidant and vitamin-rich veggies and fruits that he should be eating. Watching him eat, I'm guessing that this is because bread is easier to pick up than a slippery veggie or fruit, but all the same, smoothies have been a lifesaver for our family. C has grown to like them so much, that he has even been known to come back for second servings!

Along with this Tropical Spinach Smoothie I previously blogged about, here are a couple of other smoothie recipes from True Food Cookbook that we've been enjoying:

MORNING GLORY:
8 strawberries
1 banana
2 Tbsp coconut milk
2 tsp simple syrup
1/2 C ice

*Strawberries can be substituted for peaches, mangos, etc. Or add those in too if you want more than a single serving. If you are looking for a little more protein, I love adding vanilla Greek yogurt to this recipe.

WEEKEND WARRIOR:
1 banana
1/2 C Greek-style vanilla yogurt (1 container)
1/2 C apple juice
1 Tbsp flax meal
1 Tbsp almond butter
2 tsp simple syrup
1/2 C ice

Protein shake to the max! The Weekend Warrior is packed with energy, and a great start to the day.


Look Mom! All done!

There are so many amazing smoothie recipes to try that it's easy to find just about any type of flavors you could possibly want. With cooler fall temps just around the corner I'm looking forward to trying this Pumpkin Smoothie, this Apple Pie Protein Smoothie, and this Carrot Cake Smoothie. Just because I think it has potential to be the best thing since sliced bread, I'll be adding ingredients for this Mint Chocolate Chip Smoothie to my grocery list. Sounds amazing right? Pretty much Girl Scout Cookies in a cup...could the world possibly come up with anything better?

Do you have any great smoothie recipes?

Live.Breath.Eat.Football.

Tuesday, September 15, 2015

Over the weekend, many... many hours were spent listening to or watching just about every single football game known to man. Things kicked off Thursday night with NFL football, and the play-by-play drama that is Fantasy Football. Friday evening we listened in to the Humboldt game as they took on Boone. There were lots of touchdowns and several turnovers, so even though Uncle T wasn't playing, it was still exciting to listen in over the airwaves! Humboldt won the game, and we look forward to hopefully watching him back on the field this coming Friday.


Saturday morning, C got up earlier than expected due to the construction crew across the street starting in bright and early...on the weekend...and ended up waking papa T up for game day. I'm not sure if there is anything sweeter than a wake up call from C, who immediately snuggled down in between T & I, rolled himself into the perfect snuggle spot, put his thumb in his mouth and started in with his signature 'guy-guy-guys'...a.k.a. the sound he makes when he's tired and sucking his thumb. I reminded T that if he just rewound a few years back, at 8:00a.m., he would have already been up for a few hours tailgating. This got him moving, and he went and stocked up on our favorite bloody mary ingredients in no time.


C has moved on from the crinkle face this month, and has now perfected the scowl, or 'Say What??' face. The look on his face in these pictures just cracks me up, and T made it even more funny by trying to imitate. Boys...


As far as tailgate food for game day, I went in the direction of Thanksgiving dinner, and put some Pinterest inspiration to work and tried slow cooking a turkey. In case you were wondering, it turned out pretty amazing (recipe below). I also whipped up these deliciouis creamy garlic mashed potatoes, a quick box of stovetop, a green bean casserole, and a pumpkin pie. Fall food at it's finest!


The Hawks beat the Cyclones at Jack Trice, and everyone in our house celebrated. It was a fun game to watch, and the perfect day for a little at-home Hawkeye family photo shoot! GO HAWKS!

SLOW COOKER TURKEY | Yield: 1 turkey | Total Time: 8-10hrs

INGREDIENTS:

1 8.5 lb turkey, thawed
1 can low sodium chicken broth
3 Tbsp olive oil
3 cloves garlic, minced
2 Tbsp lemon juice
Italian seasoning
Salt & Pepper

DIRECTIONS:

Pour one can low sodium chicken broth in a slow cooker. Add turkey. Drizzle with olive oil. Season to taste with salt, pepper, garlic, and Italian seasonings. Add lemon juice and garlic to cavity. Cover and set slow cooker to LOW for 8-10 hours or until internal temp reaches 165 degrees. 

NOTE: I turned on my slow cooker around midnight the night before for an early tailgate, and the turkey was done by 8 a.m. I kept it on warm until we were ready to eat, and it did not dry out at all. It DID get warmer than the required 165 degrees, since I didn't check it until almost 9am, but with all of the extra juices, it did NOT get dried out in the slightest. #Winning

How was your weekend?

Chicken Mushroom Sage Casserole

Tuesday, September 1, 2015

Ahhh....September. With the hopefully soon-to-be cooler temps, changing leaves, and sweater weather on the near horizon, I was having a craving for a tasty satisfying dish filled with fall flavors. This delish chicken mushroom sage casserole fits the bill wonderfully. Fresh sage, parsley, mushrooms, and wild rice evoke memories of cool fall days filled with leaf piles, hikes, and an abundance of fresh air...ahhhh...can't wait! 


Inspired by a recent CSA box that came with fresh sage and parsley, this recipe was simply delish, not to mention super easy. If chicken's not your thing, you could easily exchange it for turkey, or even pheasant...according to T! I think he's trying to plant the seed now for when hunting season comes around! 


Serving Suggestions: hot swiss chard artichoke dip, steamed veggies, and crusty bread. Yum!


Recipe slightly adapted from My Recipes

CHICKEN MUSHROOM SAGE CASSEROLE | Yield: 6 servings | Total Time: 1 hr 15 min


INGREDIENTS:

1/2 C butter, divided
6 boneless skinless chicken breast halves
3 shallots, chopped
4 cloves garlic, minced
1 lb sliced mushrooms
1/4 C sherry
3 Tbsp all purpose flour
2 (14.5oz) cans low-sodium chicken broth
1 (6.5oz) pkg long grain & wild rice mix
1/2 C grated parmesan
1/4 C chopped fresh flat-leaf parsley
2 Tbsp chopped fresh sage
1/2 tsp kosher salt
1/2 tsp pepper
1/2 C sliced almonds
Garnish: fresh sage leaves


DIRECTIONS:

Preheat oven to 375 degrees. Melt 2 Tbsp butter in a large skillet over medium high heat; add chicken and cook for 3 minutes or until browned; turn and cook 1 minute. Remove to a plate, and wipe down skillet. Chicken will be partially cooked.

Melt 2 Tbsp butter in large skillet over medium high heat. Add shallots and sauté 3 minutes, or until translucent. Add garlic and sauté 30 seconds. Add mushrooms and cook 4-5 minutes, until softened. Stir in sherry, and cook 1 minute.

Meanwhile, in a 3-qt saucepan over medium high heat, melt remaining 4 Tbsp butter. Whisk in flour, stirring constantly, 1 minute. Gradually whisk in broth. Bring to a boil, whisking constantly, and cook 2-3 minutes until slightly thickened. Remove from heat, add rice (save seasoning packet for another use), next five ingredients, and shallot mixture. Transfer to a baking dish and top with chicken.

Bake at 375 degrees for 30-35 minutes, or until a the chicken's temperature reaches 165 degrees. Remove from oven and let stand for ten minutes. Sprinkle with sliced almonds and fresh sage before serving.


Thai Pineapple Peanut Chicken Satay

Friday, August 7, 2015

So...I realize I haven't done a recipe post in quite some time, but the other night I tried something new, and it was sooooo amazing, I just had to share. Realize...in northwest Iowa, any type of Thai food is nearly nonexistent, so the flavors in this particular dish were outside the norm for our rural America setting.


I've cooked with peanut butter a handful of times before, and always found the flavors to be unique, interesting, and delicious, so when I spotted this recipe, I knew I had to give it a go. SO. GOOD. I'm not going to lie, there was very little speaking during this meal...a sure sign of an out-of-the-park win! C, who has recently started to enjoy peanut butter, could barely contain his enthusiasm while eating this dish, and was wolfing it down as fast as I could cut it up to bite sized pieces! I think it's safe to say this recipe will be making an appearance again in our weeknight meal plan!


Recipe from Carlsbad Cravings

THAI PINEAPPLE PEANUT CHICKEN SATAY | Yield: 10 skewers | Marinating Time: 1 hr-overnight | Prep & Grill Time: 30min

INGREDIENTS:

2 lbs chicken (4-6 breasts) chopped into bite sized pieces
1 fresh pineapple, chopped into 1" pieces
3 Tbsp olive oil
1/3 C lite coconut milk
1/4 tsp cornstarch
1/3 C crunchy peanut butter

Marinade:
1/3 C pineapple juice
1/4 C soy sauce
1/4 C brown sugar, packed
1 Tbsp fish sauce
1 Tbsp lime juice
1-2 tsp sriracha
1 tsp dry basil
1 tsp garlic powder
1/2 tsp ground ginger
1/4 tsp black pepper

Garnish (optional):
Crushed peanuts
Green onions
Lime Juice


DIRECTIONS:

MARINADE: In a medium bowl, whisk together marinade ingredients. Add 1/4 C of this marinade and 3 Tbsp olive oil to a large freezer bag along with chopped chicken. Marinate in the refrigerator 1 hr up to overnight.

TO GRILL: Soak wooden skewers at least 30 minutes in water before grilling. Drain marinade from chicken, and thread chicken and pineapple onto skewers. Grill over medium-high heat for 5 minutes on one side, or until slightly charred, then flip and grill until chicken is cooked through and slightly charred.

TO OVEN BROIL: Soak wooden skewers at least 30 minutes in water before broiling. Line a baking sheet with aluminum foil and lightly spray with nonstick cooking spray. Add the skewers in a single layer and broil, turning every five minutes until cooked through, about 10-15 minutes.

THAI PEANUT SAUCE: Add reserved Thai Peanut Pineapple Sauce to a small saucepan and whisk in cornstarch and coconut milk. Bring to a boil, reduce heat and simmer for 1 minute. Remove from heat and stir in peanut butter. Sauce should be thick and spreadable. If too thick, whisk in some more coconut milk to reach desired consistency. Add Sriracha, lime, or brown sugar to taste.

Brush grilled kebabs with sauce, top with crushed peanuts or other garnishes, or use as dip. 

Serving suggestion: Cilantro Lime Rice

Black Bean Enchiladas

Thursday, August 7, 2014

Happy Friday loves! Can you believe it's the weekend already? Me either...I stumbled across this recipe for black bean enchiladas early last spring while I was perusing slow cooker recipes to test out in preparation for a whole lot less time available to cook once baby arrived. Yes, these can be made in the slow cooker believe it or not! For how easy and quick they are to mix up, I decided I prefer them straight out of the oven, but if you are interested in slow cooking, it does work...just put them on HIGH for 2-4 hours and sprinkle with cheese in the last 15 minutes of baking time. WaaLaa!


For me, slow cooking these enchiladas was too much of a hassle for something that doesn't take that long to prepare to begin with. They were a little difficult to get out of the slow cooker, and kind of fell apart at the end, but if that's OK with you, give it a try! If you are planning to serve this more like a casserole, and don't mind splitting the individual tortillas, then don't worry about it! Regardless of which cooking method you choose, the taste is the same. I can see how the slow cooker method may come in handy for things such as the upcoming tailgate season if you're looking for a twist on the traditional cheesy dips and pulled meat, or need a dish to stay warm for several hours. That's right, the upcoming tailgate season starts at the end of this month. Can you believe it?!? T for one, can't hardly contain his excitement, and we've been watching some reruns of old games on TV with baby C. 


After singing him the Iowa Fight Song for a lullaby, I think he's got it all figured out which team to root for! 


Step One: Gather the ingredients. Pretty basic really.


Step Two: Mix together all of the ingredients in a big bowl. If you are making a meat version, prepare the meat, or pull out some leftovers to add into the filling mix.


Step Three: Pour 3/4 C salsa into a 9x13" baking dish. Spread it around evenly. Put about 1/3 C mixture into each tortilla, and nestle together in the baking dish. Top with another 3/4 C salsa, and cover the dish with aluminum foil. *Pay no attention to my giant tortillas...grabbed the burrito size by accident!


Step Four: Bake at 400 degrees for 20 minutes, remove foil, top with cheese, and bake another 5-10 minutes until the cheese melts. Serve warm with chopped cilantro, green onion, sour cream, and any remaining salsa.

Recipe adapted from The Kitchn

BLACK BEAN ENCHILADAS | Yield: 1 9x13" baking dish | Total Time: 45 min.

INGREDIENTS:

1/2 yellow onion, diced
1/2 bell pepper, diced
1 16 oz can black beans, drained and rinsed
1 16 oz. can corn
2 tsp chili powder
1 tsp cumin
1 tsp kosher salt
2 C cheese, shredded and divided (Monterey Jack or Cheddar)
2 16 oz jars of your favorite salsa (I use PACE brand Hot salsa for a little extra kick)
12 6-8" tortillas, flour
1 C your choice of meat: chicken, pork, hamburger, shredded beef (optional) - Use leftovers if you have them!
Cilantro, green onion, sour cream (optional)

DIRECTIONS:

Mix together the onion, pepper, black beans, corn, spices, meat, and 3/4 C cheese in a medium bowl. Pour 3/4 a jar of salsa in the bottom of a 9x13" baking dish, and spread around evenly.

Put about 1/3 C filling into one of the tortillas, and roll it up. Continue with remaining tortillas and nestle side-by-side on top of salsa in the baking dish. Top with another 3/4 jar salsa. Cover with aluminum foil.

Bake at 400 degrees for 20 minutes. Uncover, sprinkle with remaining 1 1/4 C cheese, and bake uncovered for an additional 5-10 minutes, or until cheese is all melted.

Serve with remaining salsa, sour cream, green onion or cilantro. Try spanish rice or fruit salad as a side!

*NOTE: Adjust the cheese to your liking. Pre-shredded cheese typically comes in a 2 C package (hence my 2 C cheese ingredient), but if you aren't into cheesy deliciousness, or are just trying to cut back, these enchiladas are still pretty tasty made with a little less cheese. Enjoy!


Another idea...if you have leftover filling, I would highly suggest using it for a nacho topping or southwest style omelets in the morning. Both are super yummy options!

Do you have a favorite Mexican inspired recipe?
Related Posts Plugin for WordPress, Blogger...