Minestrone Soup

Tuesday, May 28, 2013

It's Tuesday! Which means that due to the Memorial Day holiday, this week is a short one. Wooo Hooo! My weekend was...in a word...a whirlwind. T & I celebrated our one year anniversary with an impromptu trip to Minneapolis, and after packing a ton of fun into the weekend, we're ready to kick back and take it easy for the rest of this week!


 Enter minestrone. Packed with veggies, this soup has great flavor and was an excellent light dinner choice to cap off a very rainy and gloomy Memorial Day.


Step One: Gather the ingredients. Funny story...I totally forgot to include in my picture anything that was canned - enter diced tomatoes, canellini beans, beef broth. Know that you need them.


Step Two: Prep the veggies and pancetta (aka chop them up!) Heat some olive oil over medium heat in a large heavy-bottomed soup pot, add the veggies and pancetta cooking for about 10 minutes, or until those onions are translucent. Add the broth, water, and parmesan, then let the soup simmer for a bit until everything is heated through. Add the beans and chopped parsley 5 min before serving. Season with salt and pepper and serve with grated Parmesan and some love :)

Recipe adapted from Food Network

MINESTRONE SOUP | Yield: 6-8 Servings | Total Time: 55 min

INGREDIENTS:

2 Tbsp olive oil
1 onion, chopped
3/4 C carrots, peeled & chopped (about 1/3 of a 1 lb. bag baby carrots or 4 carrots)
3 celery stalks, chopped
3 oz thinly sliced pancetta, coarsely chopped*
3 garlic cloves, minced
1 lb (1 bunch) Swiss chard, de-stemmed, leaves coarsely chopped
1 russet potato, peeled, cubed
1 (28.5 oz.) can diced tomatoes
2 tsp dried rosemary (or 1 sprig fresh)
1 (15-oz) can cannellini beans, drained & rinsed
3 (14-oz) cans low-sodium beef broth
1/4 C Parmesan cheese, shredded
1/4 C fresh Italian parsley, chopped
Salt and pepper
Water as needed (I used 2.5 cups)

*NOTE: If you have trouble finding pancetta, substitute bacon. You can also just leave it out if you prefer a meatless soup.

DIRECTIONS:

Heat the olive oil in a heavy large pot over medium heat. Add the onion, carrots, celery, pancetta, and garlic. Saute until the onion is translucent, about 10 minutes. Add the Swiss chard and potato; saute for 2 minutes. Add the tomatoes and rosemary. Simmer 10 minutes until the chard is wilted and the tomatoes break down.

Add the broth and Parmesan to the vegetable mixture. Simmer until the potato pieces are tender, about 15 minutes. Stir in the beans and parsley. Simmer an additional 5 minutes until the beans are heated through. Season with salt and pepper, to taste.

Serve sprinkled with Parmesan cheese.

One Year Anniversary Celebrations

Sunday, May 26, 2013

T and I celebrated our one year anniversary with a quick overnight trip to Minneapolis for a nice dinner out on the town. A NOTE: If you have an appreciation for wine and would like some unique picks to choose from, check out Toast Wine Bar & Cafe in the North Loop. I tried a wine all the way from Croatia! In other news, we had an amazing dinner at Bar La Grassa. The head chef won the James Beard Foundation award for best chef in the Midwest. Pretty amazing. I won't lie. In our quest for the next most unique thing to eat, we added sweetbread (thymus gland) and foie gras (duck liver) to the list. Seeing as we made it through the weekend alive, they turned out not to be as scary as they sound.


And just one more...I couldn't resist.

Did you do anything fun over the Memorial Day holiday?

Strawberry-Rhubarb Pie

Friday, May 24, 2013

Memorial Day weekend is upon us. Can you believe it!?! I, for one, certainly didn't see it coming! I mean, it was only a measly three weeks ago that there was still snow on the ground! Ugh.


In other news, T & I will be celebrating our one year anniversary this Sunday. The year has gone by so fast that it doesn't seem possible that we could be celebrating our one year already! Unfortunately, T's current work schedule is putting a major crimp in our style, so we won't be doing anything too grand this year to celebrate. At least not this weekend. A 40-hour time period (minus sleeping time) really doesn't work well when we are about 3 hours away from anywhere we would consider visiting for a little getaway celebration.


HOWEVER, just because our celebrating for the weekend is undetermined, it doesn't mean yours has to be! Please, please, make this pie. It is beyond delicious, and, if you don't mind my saying...super patriotic in celebration of this Memorial Day weekend. Enjoy!


Step One: Gather the ingredients. Make the pie crust. Chill. Roll out the bottom crust and place in pie dish. Chill before adding filling.


Step Two: Mix together the filling. Fill up the pie! Decided what you want to do with the design on the top. As you can see, I chose stars. How Patriotic of me right? Preheat the oven.


Don't forget to make a foil collar around the edges of your pie crust so it doesn't burn while cooking!

Recipe from Food Network

STRAWBERRY-RHUBARB PIE | Yield: 1 pie | Total Time: 1 hour 30 minutes

INGREDIENTS:

Crust:
2 C all-purpose flour
1/2 C cake flour (I used Soft As Silk)
3 tsp powdered sugar
1/2 C butter-flavored shortening
1/4 C salted butter
Pinch salt
1 egg
2 tsp vinegar
1/4 C ice cold water

Filling:
2 1/2 C chopped red rhubarb
2 1/2 C strawberries, cut in large pieces
1 1/2 C sugar
2 Tbsp minute tapioca
1 Tbsp all-purpose flour
1/2 tsp lemon zest
1/2 tsp lemon juice
1/2 tsp ground cinnamon
1 tsp vanilla extract
3 Tbsp butter, cubed small* (optional - AKA I always forget this and it turns out just fine)
1 egg white beaten with 1 tsp water
Large granule sugar

DIRECTIONS:

CRUST:
Use a pastry blender to blend the flours, sugar, shortening, butter and salt.* Whisk the egg, vinegar and water in a 2-cup measure and pour over the dry ingredients. Mix in the wet ingredients without overworking the dough. Form a ball, and toss any additional flour over the ball (for best results, cover with plastic wrap and chill if possible). Divide the dough into 2 disks. Roll out 1 piece of dough to make a bottom crust. Place into a pie dish. Cover with plastic wrap, and put dish in refrigerator to chill.


*NOTE: If you don't have a pastry blender (me), you can also use a potato masher for a similar effect.


Preheat oven to 425 degrees.

FILLING:
Mix the rhubarb, strawberries, sugar, tapioca, flour, zest and juice of lemon, dash of cinnamon, and vanilla. Mix well in a large bowl and pour into chilled crust. If you are using butter, now is the time to dot the top of the filling. Roll out the other piece of dough. Now's the time to impress! I got fancy and used a cookie cutter to make stars for the top of my pie. You can do any design you want. Cover it all up, leave some out and use cut-outs, the world is your oyster! Brush the edges of the pie crust with the egg wash and place the dough over the top, crimping to seal. Brush the entire pie top (crust portions only) with egg wash, and sprinkle with sugar.

*NOTE: If you are using cut-outs, you'll still want to brush the pie crust pieces on the top to give them that glazed look. If you forget (me), this will not ruin your pie, so don't worry about it.

Collar with foil (to avoid burning the edges), and bake at 425 degrees for 15 minutes. Decrease the temperature to 375 degrees and bake for an additional 45-50 minutes, or until the filling starts bubbling. Cool before serving.


Do you have any exciting plans for Memorial Day?

Greek Village Salad

Tuesday, May 21, 2013

I may be on a total Greek food kick lately. I just love the light flavors and healthy amounts of veggies that tend to be incorporated into Greek dishes. Not to mention that most of my favorite ingredients (tomatoes, olive oil, feta cheese, etc) are almost always involved. Bonus!


This salad is especially easy to throw together, and makes an excellent side dish for summertime grilling. Not to mention an excellent way to use up some of those cucumbers from your CSA or home garden. T & I may have resorted to Hendricks and tonic with cucumber last summer as one of the only things we could think to do with the massive amount of cucumbers in our CSA. Of course...if you have small enough cucumbers and canning gear, you could also make pickles...


Step One: Gather the ingredients. Cucumber, tomato, red onion, garlic, red pepper, feta, oregano, red wine vinegar, salt, pepper and olive oil. That's it! Yaaa for using cucumber!


Step Two: Chop the veggies to bite-sized pieces, then toss everything together in a large bowl. That's it!  I would recommend finding someone to fire up the grill while you are chopping. This salad takes no time at all to get ready, and is best devoured immediately, or shortly thereafter.

Recipe from What's Gaby Cooking

GREEK VILLAGE SALAD | Yield: 8-10 servings | Total Time: 20 min.

INGREDIENTS:

GREEK VINAIGRETTE:
1 clove garlic, minced
3 Tbsp olive oil
3 Tbsp red wine vinegar
1 tsp dried oregano
kosher salt
freshly ground black pepper

SALAD:
4 C cherry or grape tomatoes, chopped
2 medium cucumbers, chopped
2 red or yellow peppers, chopped
1/2 red onion, thinly sliced
8 oz feta, drained and crumbled*
freshly ground black pepper

*NOTE: You can use the feta blocks and crumble yourself, or purchase pre-crumbled feta. Either will work fine. If you only have 2-3 dinner guests, I would recommend halving this recipe.

DIRECTIONS:

In a small bowl, whisk together all the ingredients for the vinaigrette. Season with salt and pepper and set aside.

In a large bowl, combine all of the chopped veggies, top with the Greek vinaigrette, and toss together. Add the feta, and very gently toss to combine. Adjust pepper and serve immediately at room temperature.

Do you have any recipe ideas that use cucumber? I'd love to hear them!


Visits from Friends

Monday, May 20, 2013


My good friend Lady J came to visit over the weekend, and we had so much fun hitting up some of T & I's favorite spots. We had tapas and listened to live music at 4 Sisters; made a trip to Grandad's Bluff lookout; took a walk through Riverside Park on a beautiful - yet hot - afternoon; and enjoyed some homemade strawberry-rhubarb pie (more on that later) and black-eyed susans for the Preakness on Saturday. La Crosse is about 3.5 hours from most of our close friends or family, so we always have so much fun when we have weekend visitors who we don't often get a chance to see! 


T & I enjoying the views at Grandad's Bluff. I'll miss this view when we move away from La Crosse!

Chicken Piccata with Lemon and Capers

Friday, May 17, 2013

Chicken Piccata. Lemon. Capers. Chicken. Yum.

TRUTH: I was all ready to post about this yesterday...until I realized I pretty much only had one good picture from the last time I made it. Does that ever happen you? You're all excited to share something with someone, and then...poof! Nothing. TRUTH TWO: I may also have left my camera on the last time I used it, which in turn lead to a late dinner so that I could charge the battery in order to take the new photos... Luckily, this recipe only takes about 30 minutes!


A quick and easy recipe to add to your weeknight cooking is never a bad thing. Especially when it turns out as delicious as this one. Light and tasty, the flavors of lemon and capers transport me to Italy and the Mediterranean. White wine is a requirement. I recommend a chilled glass of Chardonnay to accompany this tangy chicken dish. As you can see from the above pictures, the presentation of this dish lends itself to both a standard weeknight dinner (1st picture served with skillet new potatoes and diced red onions), or special occasion (2nd picture served with celariac puree and steamed carrots). Both delicious. Both requiring similar amounts of time.


Get together the ingredients. There isn't anything too fancy involved here. A nice dry smooth oaky (I could go on, but I'll spare you...) Chardonnay will do the trick. Feel free to use cooking wine if you prefer, however, know that the 1/2 C wine is boiled down so much that the alcohol in it is burned off. However, the flavor it brings is worth opening that bottle if you're on the fence.

A note about shallots: In the past, I have had difficulty finding them. Usually they are located close to the garlic and onions, sometimes in a mesh bag, sometimes in a small bin. If you can't find them, the flavor profile is basically a mix of red onion and garlic. Substitute 1/4 C red onion + 1 clove minced garlic for a similar taste if you have trouble tracking them down.

Recipe adapted from Cooking Light

CHICKEN PICCATA WITH LEMON AND CAPERS | Yield: 4 servings | Total Time: 30 min.

INGREDIENTS:

4-5 boneless skinless chicken breast halves (1 1/2 - 2 lbs.)
1/2 C all-purpose flour, divided
1/2 tsp kosher salt
1/4 tsp freshly ground black pepper
2 1/2 Tbsp butter, divided
2 Tbsp olive oil, divided
1/4 C finely chopped shallots
4 medium garlic cloves, thinly sliced
1/2 C dry white wine (I prefer Chardonnay)
1 C low-sodium chicken broth, divided
3 Tbsp fresh lemon juice
2 Tbsp drained capers
3 Tbsp coarsely chopped fresh flat-leaf parsley

DIRECTIONS:

Layer chicken in between two sheets of heavy-duty plastic wrap or waxed paper, and use a meat mallet to pound to 1/2-inch thickness. Place 1 tsp flour in a small bowl, and the rest in a shallow dish. Sprinkle both sides of chicken with salt and pepper. Dredge chicken in flour in shallow dish; shake off excess.

Melt 1 Tbsp butter in a large skillet over medium-high heat. Add 1 Tbsp oil; swirl to coat. Add chicken; saute 4-5 minutes on each side, or until done. Remove chicken to a warmed plate and tent with foil.

Heat remaining oil in pan. Add shallots and saute 2-3 minutes, stirring frequently until slightly browned. Add garlic, saute 1 minute, stirring constantly. Add wine; bring to a boil, scrape pan to loosen browned bits. Cook until most wine evaporates,  add 3/4 C broth, and boil until reduced by half.

Meanwhile, add 1/4 C broth to reserved 1 tsp flour. Whisk until combined. Add to skillet and cook 2-3 minutes or until slightly thickened, stirring frequently. Remove from heat; stir in remaining 1 1/2 Tbsp butter, 3 tsp lemon juice, and 2 Tbsp capers.

Spoon sauce over chicken and sprinkle with parsley to serve.


Do you make any Mediterranean inspired dishes? I'd love to hear about them!

Sweet Potato Chili Mac & Cheese

Tuesday, May 14, 2013

It's sweet potatoes. It's chipotle chilies. It's mac & cheese. It's a spiced-up veggie-fied version of the classic. Today I bring you Sweet Potato Chili Mac & Cheese.


Doesn't that look aaaahh-mazing? It was. Bonus points for the extra veggies. We are coming up on swimsuit season after all. Wouldn't want to shouldn't be downing too much cheese...(NOTE: T & I may have enjoyed CHEESY pizza twice in the last 4 days...ooops...If you don't tell, I won't.) Back to the recipe. The creamy texture of sweet potatoes mixed with the smoky spiciness of the chipotles and the crunch of the browned sausage topped with crispy green onions makes this dish quite delicious.


Step One: Gather the ingredients. If you can't find, or don't like the flavor of Mexican chorizo, just substitute any hot sausage.


Step Two: Pierce and bake the sweet potatoes in a oven preheated to 425 degrees for 1 hour. Allow to cool, then peel and mash in a large bowl before adding milk, chipotle chilies, salt and pepper.


Step Three: Cook and drain your pasta of choice, then combine with sweet potato mixture and cheese. Mix well. Meanwhile, heat the olive oil in an ovenproof skillet and brown the sausage.

Step Four: Preheat the broiler. After browning the sausage, remove to a plate and wipe the skillet of excess oil. Transfer the sweet potato mix to the skillet and top with sausage. Place in the oven under the broiler for 2 minutes, or until the top begins to brown and become crispy. All that's left now is to enjoy every last bite!

Recipe adapted from Cooking Light

SWEET POTATO CHILI MAC & CHEESE | Yield: 6 servings | Total Time: 1 hr. 30 min.

INGREDIENTS:

3 medium sweet potatoes (about 2 pounds)
1 C skim milk
3 Tbsp chopped chipotle chili, canned in adobo sauce + 1 Tbsp sauce
1/2 tsp kosher salt
1/4 tsp freshly ground black pepper
3 oz Monterey Jack cheese, shredded (about 3/4 C packed)
8 oz whole-wheat macaroni or penne pasta
1 Tbsp olive oil
6 oz Mexican chorizo, casings removed*
1/4 C chopped green onions
2 Tbsp chopped fresh cilantro

*NOTE: If you can't find chorizo, use a hot Italian sausage for a similar taste.

DIRECTIONS:

Preheat oven to 425 degrees. Pierce the sweet potatoes with a fork or knife, and place on a foil-lined baking sheet. Bake for one hour. Cool slightly; peel and mash in a large bowl. Stir in the milk, chipotle chilis, salt and pepper.

Cook pasta according to directions; drain. Add pasta to sweet potato mixture and set aside.

Preheat oven to broil.

Heat oil in a large ovenproof skillet over medium heat. Add chorizo, or hot sausage, cooking 4 minutes, or until browned. Stir to crumble. Remove cooked sausage to a small bowl and wipe pan of excess oil. Add sweet potato mixture into pan, sprinkle with chorizo, and broil 2 minutes or until lightly browned and crisp. Sprinkle with onions and cilantro to serve.


Do you have any favorite variations on the classic mac & cheese?

Stir-Fried Eggplant with Turmeric-Soy Sauce

Friday, May 10, 2013

Happy Friday everyone! I hope you all have had a wonderful week. Isn't it wonderful that the temperature has finally decided to go up and hover above freezing for once? NO MORE SNOW OR ICE. The trees finally have little leaves and the grass has turned green. Spring has officially arrived...only about 2 months late, but it got here right?


Today's recipe inspiration came partly from the current book I am reading, Snow Flower and the Secret Fan, by Lisa See. Set in nineteenth-century China in a remote Hunan county, Snow Flower and the Secret Fan is an incredible journey into the lives of two young girls in China, and the mysteries of the inner (women's) realm including foot binding, Laotong relationships, secret Nu Shu women's writing, matchmakers and arranged marriages. Like I said, very interesting. If you're looking for a good read to the kick off of summer, this is a great choice.

Enough for now about good books. (On a side note - I love recommendations. If you have any to share, leave me a comment). What I'm getting at is that with all of my reading about Chinese culture, I wanted to find a recipe to infuse some Asian cuisine into my dinner routine. Enter oriental eggplant. This can sometimes be called Chinese eggplant or Japanese eggplant. It has a shape similar to cucumber or zucchini, and is slightly easier to work with than the regular eggplant variety that can sometimes lean towards monstrous in size. HOWEVER, if you can't find oriental eggplant, regular eggplant works just fine, you'll just need to cut it into smaller pieces.


Step one: Gather the ingredients. Make the sauce.


Step two: Heat the oil over high heat in the wok. Add the onion and eggplant. Allow to sear, then stir with a wooden spatula or spoon occasionally for 3-5 minutes. Add half of the sauce stirring to coat. Add more sauce as needed.

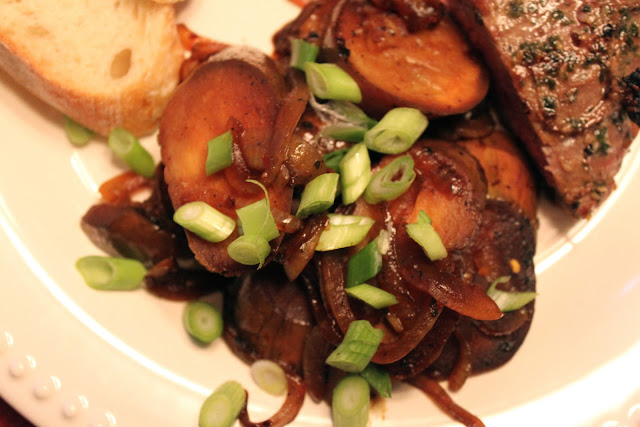
T and I enjoyed this eggplant dish with a delicious ginger-garlic marinated flank steak hot off the grill. Lucky for us, our local grocery store has some great pre-marinated meats to choose from for grilling. You could also stir fry some chicken or beef and serve with rice to make a complete meal.

Recipe from True Food cookbook

STIR-FRIED EGGPLANT WITH TURMERIC-SOY SAUCE | Yield: 4-6 Servings | Total Time: 10 minutes

INGREDIENTS:

4 cups oriental eggplant, sliced on the bias into 1/2-inch pieces (about 2-3 eggplants)*
1 1/2 C onion, thinly sliced (1 onion)
2 Tbsp low-sodium soy sauce
1 Tbsp honey
1/2 tsp red pepper flakes
1/4 tsp ground turmeric
1 tsp olive oil
1-2 scallions, thinly sliced (for serving)

*NOTE: Oriental eggplant may also be called Japanese or Chinese eggplant. They are long and skinny vs short and fat like the traditional American eggplant. The tastes are similar if you are unable to find the oriental variety. You'll just need to cut them into smaller pieces, and cook them a little longer since the oriental variety has a thinner skin and cooks more quickly.

DIRECTIONS:

Whisk together soy sauce, honey, red pepper flakes, turmeric, and 2 Tbsp water in a small bowl. Set aside.

Heat wok or skillet over high heat. Add oil. When oil is hot, add eggplants and onion. Allow them to sear, then toss using a wooden spatula for 3-5 minutes. Add half of the turmeric-soy sauce, then more if the eggplant is too dry. Transfer to a serving dish and sprinkle with scallions to serve.


Are you ever inspired in the kitchen by a book you've read?

A Month in Review

Tuesday, May 7, 2013

Busy. Busy. Busy. That explains the entire last month. April went by in a whirl with many many exciting happenings to celebrate. Among them...

1. Pop the champagne! We officially bought a house!! We are soooo excited to be moving back to the Iowa Great Lakes area this July. Our home is currently under construction, so you'll have to wait for pictures! Move in date TBD. T and I have been busy choosing cabinets, granite, fixtures and paint colors among many other fun things. There's still a long ways to go, but it has been fun to see it all come together.


2. My brother Tyler married his high school sweetheart Heather on April 20th. So excited to have been part of their special day and officially add another girl to the family! Love you two. And hope you love your honeymoon this June to Kennebunkport, ME and Martha's Vineyard, MA as much as I loved helping to plan it! T and I are going to need to make a trip to this area sometime soon I think...


3. T and I took a trip to Florida. It was soooo nice to get out of the never-ending winter for a week! We spent most of the trip enjoying walks on the beach and relaxing in the Gulf of Mexico on Anna Marie Island. The highlight of the week was sharing a very memorable dinner at Crab & Fin in St. Armands. Outdoor patios with live piano music, a bottle of wine, fresh fish, chocolate cake and limoncello...it just doesn't get any better. We will definitely be returning.


A view of the beach.


Date night in St. Armands.


T and I catching some sun by the pool.


T thinking about trying out boogie boarding...If you know him, you know this was doomed to go down as an epic fail. Gotta give the kid props for trying though!


DISNEY! 

Later in the week, we had sooooo much fun with an impromptu visit from one of my best friends H and her husband K. The four of us ventured out on an overnight trip to Orlando and a visit to Epcot where we spent our time eating and drinking our way around the world. T and I especially enjoyed Germany (beer & brats), Morocco (falafal & cous cous) and the U.K. (cheese & scotch).


K and H enjoying...or in K's instance...not enjoying...sake in Japan.

Back on Anna Maire, we were even lucky enough to see a manatee and dolphins while boating with my aunt, uncle and cousin in the Gulf. All in all, a very memorable trip, and we look forward to making a return visit.

To see all of the pictures from our trip, CLICK HERE.


Just one of the many beautiful sunsets on the beach. Until next time...

Vegan Butternut Squash-Apple Soup

Thursday, May 2, 2013

April showers bring May snow? If what you see through your window looks anything like the frosted and ice covered version of spring that I'm seeing out mine right now, then apparently Mother Nature missed the memo. One would think that at some point we might actually have some real spring weather before summer arrives. I can practically see the trees shivering with embarrassment from going without leaves for so long!


The perfect velvety texture, without using unhealthy heavy cream, in a squash-based soup can be pretty hard to create. I've taken a stab at many squash soup recipes, and had many trials and tribulations along the way. All have been good in their own unique way, but this recipe in particular produced that velvety soft texture with a hint of sweetness I had been striving for. The best news? Not a drop of heavy cream, and thus a healthy squash soup! NOTE: if you are allergic to nuts, this recipe is not for you.

The secret ingredient, cashew milk, is a new concept for me. I was pretty much amazed by how easy it was to make, and how much it represented the look and texture of regular dairy-based milk. I think next time, I may try a different nut-based milk...possibly almond milk. I think almonds would compliment the squash and apple flavors nicely, and are also much easier to find during all times of the year...or I could just buy almond milk, and save myself a step...hmmm...


Anyways...back to the recipe. Be warned that this is a very filling soup. It would be delicious served in a small cup or bowl at lunch alongside a warm turkey/cranberry panini. Ahh...now I'm dreaming of fall, late-season harvest, and leaves crunching beneath my feet. The good news is, as long as you can find squash, most of these ingredients are available year-round, and you won't have to wait for 5 months to try it.


Step One: Gather the ingredients.


Have fun peeling the butternut squash! It is imperative that you have a sharp vegetable peeler, or this task could give you some lots of grief. Cut up all of the produce (squash, onions, apples), toss with some olive oil, and add a little cayenne pepper and salt before roasting.


Step Two: Roast the squash/apple/onion mixture in an oven preheated to 400 degrees for 45 minutes. Allow to cool before handling.


Step Three: Meanwhile, make the Cashew Milk. Easy peasy. For an easier route, try substituting Almond Milk if you don't want to make your own.

Recipe adapted from True Food cookbook

Step Four: Blend the squash/apple/onion mixture using a regular, or immersion blender. As you can see, the immersion blender is my weapon of choice. Add 1 1/4 C water 1/4 cup at a time, blending as you go. Add cashew milk, mix well, and adjust water until you reach the desired consistency. Serve topped with soup crackers.

VEGAN BUTTERNUT SQUASH-APPLE SOUP | Yield: 8-10 servings | Total Time: 2 hours

INGREDIENTS:

1 medium butternut squash, peeled, seeded, and cut into 1-inch pieces (about 8 cups).
5 Granny Smith apples, peeled, cored, cut into wedges
1 large onion, diced
3 garlic cloves, minced
1 Tbsp olive oil
1 tsp kosher salt
1/2 tsp cayenne pepper
1 1/4 C water - or until desired consistency*
3 C cashew milk (see below)

Soup crackers, to serve

*NOTE: Add water 1/4 C at a time and blend to combine. After adding cashew milk, adjust water to your desired consistency. I probably added around 3-3 1/2 C total water. Depending how big your squash and apples are, this measurement may vary.

DIRECTIONS:

Preheat oven to 400 degrees. Peel, de-seed and chop butternut squash into 1-inch pieces. Peel apples, then use an apple slicer to core and cut apples into wedges. Dice onion and mince garlic. Combine in a large bowl with olive oil, kosher salt, cayenne pepper. Toss to coat.

Spread squash/apple/onion mixture over two aluminum lined baking sheets. Roast in oven 45 minutes, or until tops begin to brown. Remove and allow to cool 10-15 minutes before handling. Now is the time to put together the cashew milk (recipe below).

After the squash/apple/onion mixture has cooled, use a blender or immersion blender to puree. Add 1 1/4 C room temperature water 1/4 C at a time, blending after each addition to mix. Add Cashew Milk and stir or whisk together. Adjust water after adding cashew milk until you reach your desired consistency.

CASHEW MILK | Yield: 3 C | Total Time: 5 minutes

1 C cashews
2 C water

*NOTE: Almond milk is readily available at most grocers. If you don't want to make your own cashew milk, it would serve as an excellent substitute.

DIRECTIONS:

Add cashews to a blender or food processor. Chop until the consistency is a fine powder, stopping before forming a paste. Add 2 C water and liquify for 2 minutes. Use immediately, or store up to 5 days in the fridge.


Have you been craving soup lately with this crazy cold weather lingering on?
Related Posts Plugin for WordPress, Blogger...