Monday, December 31, 2012

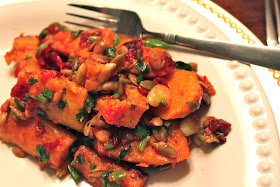
Cranberry Chipotle Sweet Potato Salad

This meatless monday, I bring you a wonderful warm and hearty salad. Lately, I have had an abundance of sweet potatoes staring at me from my countertop, and have stressed about enjoyed finding new ways to cook with them. Straying from the traditional calorie and sugar loaded casseroles topped with massive amounts of marshmallows - a delicious way to eat sweet potatoes in case you were wondering - I was thrilled to find a healthy recipe to try out.


With the combination of sweet, crunchy, salty, smoky, spicy and fresh, I knew the instant I laid eyes on the recipe that the flavor profile of this dish would be amazing. I also correctly assumed that I might have trouble tracking down pepitas, aka shelled pumpkin seeds. After searching high and low, I finally found them at Woodman's grocery store.


If you have access to a Woodman's, definitely go check it out. Their fresh produce section blows everything else out of the water, and has ridiculously, awesomely, obscure veggies available. I especially love the fact that they regularly carry fresh prickly pear cactus leaves, massive two-foot daikon radishes, sea beans, and miniature Japanese eggplants. In a word, Woodman's is incredible. Don't even get me started on their international food selection and giant fresh cheese aisles.

Recipe adapted from Cooking Light

CRANBERRY CHIPOTLE SWEET POTATO SALAD | Yield: 8 servings | Total Time: 1 hr.

INGREDIENTS:

2 1/2 pounds sweet potatoes, peeled and cut into 2-inch pieces
3 Tbsp olive oil, divided
3/4 tsp kosher salt
1/2 tsp freshly ground black pepper
3/4 C fresh or frozen cranberries
1/4 C water
2 tsp honey
1 (7-oz) can chipotle chiles in adobo sauce
1/2 C salted pepitas (pumpkin seeds)
3/4 C chopped green onions
1/4 C fresh cilantro leaves

DIRECTIONS:

Preheat oven to 450 degrees.

Place cut pieces of sweet potato in a large bowl and drizzle with 2 Tbsp olive oil. Toss to coat. Transfer sweet potatoes to a foil lined baking sheet and sprinkle with salt and pepper. Bake for 30 minutes, or until tender, turning after 15 minutes.

Meanwhile, combine remaining 1 Tbsp olive oil, cranberries, water, and honey in a saucepan. Remove 3-4 chiles from the can; finely chop to equal about 2 Tbsp. Add chopped chipotle and 2 tsp adobo sauce to pan. Place pan over medium-low heat; bring to a boil. Cover, reduce heat, and cook 10 minutes or until cranberries pop, stirring occasionally. Remove from heat. Mash with a potato masher or fork until chunky.

Place pepitas in a medium skillet; cook over medium heat 4 minutes or until lightly browned, shaking pan frequently.

NOTE: If you are unable to find pepitas, salted shelled sunflower seeds have a very similar size, taste and texture and are readily available in most grocery stores.

Combine potatoes, pepitas, onions, and cilantro in a bowl. Add cranberry mixture to bowl; toss gently to coat.


The flavor combination of the smoky and spicy chipotle chiles in adobo sauce, the sweet flavor of the sweet potatoes, and the fresh flavors of the green onions and cilantro made for a wonderfully delicious dish.

What is the most ridiculous produce you have come across at the store? I challenge you to find something more obscure than prickly pear cactus leaves - seriously!

Friday, December 28, 2012

Gingerbread Cookies

When the weather turns colder and snow starts falling outdoors, I find myself dreaming of the delicious smells of fresh gingerbread baking in the oven. I remember going to church dinners as a child and being fascinated at the intricate gingerbread house centerpieces and their amazing decorations. Slivered almonds for shingles, licorice for columns, red hots for window frames and shaved coconut dyed green for miniature evergreens. So much artistry and painstaking hours go into those creations!


There have been multiple years I tried to create such a masterpiece at home, but the closest I ever came was baking the walls too thick and resorting to a graham cracker house - same concept, and still fun to decorate, but not nearly the level of craftsmanship that I had come to appreciate. Until I come across one of these gingerbread-house-making aficionados who is willing to teach a class on their techniques, I've decided I will have to settle for baking and eating the delicious cookies instead.


Step One: Mix together the ingredients.


Step Two: Divide the dough in half, wrapping each half in plastic wrap and allowing it to sit on the counter for at least two hours. This will give the flavors a chance to meld together. If you were me, this would be an excellent chance to sit down, relax, and enjoy a glass or two of wine.


Step Four: Roll out the dough, and cut out the cookies using your shape of choice. I added a sprinkling of sugar to mine before baking since I didn't want to frost them later. Allow time to cool on a wire rack before devouring.

Recipe from food.com

GINGERBREAD COOKIES | Yield: 24 cookies | Total Time: 2 1/2 hours

INGREDIENTS:

3 C all-purpose flour
1 1/2 tsp baking powder
3/4 tsp baking soda
1/4 tsp kosher salt
1 Tbsp ground ginger
1 3/4 tsp ground cinnamon
1/4 tsp ground cloves
6 Tbsp unsalted butter
3/4 C brown sugar
1 large egg
1/2 C molasses
2 tsp vanilla
1 tsp finely grated lemon zest (optional)

DIRECTIONS:

In a small bowl, whisk together flour, baking powder, baking soda, salt, ginger, cinnamon, and cloves until well blended.

In a large bowl (I used a stand mixer), beat butter, brown sugar, and egg on medium speed until well blended. Add molasses, vanilla, and lemon zest and continue to mix until well combined.

Gradually stir in dry ingredients, and blend until smooth.

Divide dough in half and wrap each half in plastic, letting stand at room temperature for at least 2 hours or up to 8 hours.

NOTE: The dough can be stored for up to 4 days in the refrigerator. Return to room temp before using.

Preheat oven to 375 degrees. Grease or line baking sheets with parchment paper.

Place 1 portion of the dough on a lightly floured surface, and roll to 1/4-inch thick. Use additional flour to avoid sticking. Cut out cookies using your cutter of choice, and space cookie cut-outs 1 1/2 inches apart on baking sheets.

NOTE: I sprinkled the cookies with sugar before baking, if you plan to decorate with frosting, wait until after baking.

Bake for 7-10 minutes, and let cool on baking sheet until firm enough to move to wire rack. Once cool, decorate to your liking.


These cookies turned out soft and chewy and simply delicious, and as a bonus, make your home smell amazing.

What are your favorite holiday cookies?

Wednesday, December 26, 2012

Scenes from Christmas 2012

Happy Holidays! I hope everyone had a wonderful Christmas!


This year, after much persuasion, T convinced me that we needed a live Christmas tree. I don't recall EVER having a live tree growing up, but do recall hearing about how much of a mess they are - they have to stay watered without leaking, they drop pine needles all over the floor, and they can be a fire hazard and potentially burn down your house. Not exactly the easiest or safest way to celebrate the holidays! 

After deciding it was best to buy a pre-cut tree instead of having to secure the necessary tools to chop down our own, we landed at Menards in an aisle full of options. T immediately locked eyes on a giant Clark Griswald type 9-foot tree that would have NEVER fit in our home, but after several tense minutes of pouting talking him down, we I ended up finding a much smaller 5-foot version that worked perfectly. After getting the tree home, I put T to work on the base, and I went to get all of the decorations out.


Over the years, we have made it a custom to bring home an ornament from all of our travels. It was so much fun to reminisce about our wonderful vacation memories as we decorated our tree.


Some of our favorite ornaments from left to right: Okoboji, where we were married and have spent many wonderful weekends; Jamaica, where one of my best friends was married; Riviera Maya, Mexico, where one of T's good friends was married; Puerto Rico, T & I's first big trip together outside of the continental U.S.; Costa Rica, where we spent our honeymoon; Badlands, South Dakota, a stop along a very loooooong cross country road trip to celebrate T's graduation, and my first experience camping.

A holiday ornament collection of our past travels may be the single greatest souvenir idea we have ever had, and a great way to remember all of our wonderful memories.

How do you decorate your tree?

Monday, December 24, 2012

Cinnamon Rolls

Happy Christmas Eve! This year is T and I's first official Christmas together since getting married. So exciting! We have spent holidays together before, but this year, we finally get to spend Christmas day together - truly something to be thankful for. The last couple of years the timing hasn't worked out, and we have had to spend Christmas many miles apart due to work schedules and travel plans not matching up.


Our first Christmas together got me thinking about holiday traditions. Looking back, I have come to the realization that I have been surrounded by holiday traditions my entire life. A typical Christmas holiday in my family included gathering with my Dad's side of the family on Christmas Eve to go to church, and then heading back to a relative's home to have a light meal with soup, sandwiches, appetizers and Christmas cookies while catching up and reminiscing about the year and what everyone has been up to.


Many people have a tradition of opening gifts on Christmas Eve, but in my family, we always waited until the morning after so that Santa Claus had a chance to pay a visit. I remember lying in bed as a child unable to sleep fearing that I might miss the chance to see Santa or his reindeer and sleigh flying across the night sky on Christmas Eve. One of the great memories I have of my siblings is the excitement of Christmas morning and waking each other up and wondering aloud what Santa might have brought while huddling under a blanket pretending to go back to sleep per our parent's orders and statements of fact that it was much too early for any gift opening.


On recent Christmas mornings, before opening any gifts, my family has a tradition of having brunch. Yum. Yum. Yum. Delightful scents of fresh baked cinnamon rolls, hashbrowns, coffee cake, egg casserole, bacon and fresh-brewed coffee slice through the air and I know...Christmas has arrived. I won't lie, the idea of someone else cooking breakfast for me ranks right up there with my thoughts on 75+ temperatures. Delightful.

Recipe from The Bread Baker's Apprentice


CINNAMON ROLLS | Yield: 8-12 large rolls, or 12-16 small rolls | Total Time: 3 1/2 to 4 hrs.

INGREDIENTS:

6 1/2 Tbsp sugar
1 tsp salt
5 1/2 Tbsp unsalted butter, margarine or shortening, at room temperature
1 large egg, slightly beaten
1 tsp lemon extract OR 1 tsp lemon zest
3 1/2 C flour
2 tsp instant yeast
1 1/8 to 1 1/4 C whole milk or buttermilk, at room temperature
1/2 C cinnamon sugar (6 1/2 Tbsp sugar, plus 1 1/2 Tbsp ground cinnamon
White fondant glaze, recipe follows

NOTE: Substitute 3 Tbsp powdered milk + 1 C water if you do not have whole milk or buttermilk.

WHITE FONDANT GLAZE
4 C powdered sugar
1 tsp lemon extract
6 Tbsp to 1/2 C warm milk

Sift powdered sugar into a bowl. Add lemon extract. Add the milk slowly, whisking until the sugar is dissolved. Only add as much is needed to make a thick, smooth paste.

DIRECTIONS:

Cream together the sugar, salt, and butter on medium-high speed in an stand mixer with a paddle attachment (You can also mix by hand if you do not have a stand mixer); if you are using powdered milk, cream the milk with the sugar, but add the water with the flour and yeast. Add in the egg and lemon extract and mix until smooth. Add the flour, yeast, and milk.

Mix on low speed until a ball of dough forms. Switch to the dough hook attachment, and increase speed to medium, mixing for approximately 10 min. (12-15 min. if you are kneading by hand). You want the dough to be silky and tacky, but not sticky. Adjust the flour or water until you get this consistency. The dough should be able to stretch apart without breaking off immediately, and register at 77-81 degrees.

Oil a large bowl, and transfer the dough, rolling it around to coat with oil. Cover the bowl with plastic wrap to trap the heat, and proof at room temperature for 2 hours, or until the dough doubles in size.

Mist the counter with spray oil, and transfer the dough to your workspace. Roll the dough with a flour-covered rolling pin into a rectangle about 2/3 inch thick and 14x12 inches long for larger buns, or 18x9 inches long for smaller buns. Be sure not to roll the dough too thin, or the finished buns will be tough instead of soft. Sprinkle the cinnamon sugar over the surface of the dough, and roll the dough up into a cigar-shaped log, creating a cinnamon sugar spiral as you go. With the seam side down, cut the dough into 8-12 even pieces about 1 3/4 inch thick for large buns, or 12-16 pieces 1/14 inch thick for smaller buns.

Line 1 or more sheet pans with parchment paper, and place buns approximately 1/2 inch apart. Cover with plastic warp, and proof (let rise) at room temperature for 75-90 minutes, or until the pieces have expanded into one another and nearly doubled in size.

NOTE: You can also put the rolls in the fridge at this point for up to 2 days. Pull the pans out 3-4 hours before baking to allow the dough to proof.

Preheat the oven to 350 degrees. Bake the cinnamon rolls on the middle oven rack for 20-30 minutes, or until golden brown.

Cool the buns in the pan for about 10 min. and then streak with white fondant glaze while still warm. Remove the buns from the pans, and cool on wire rack for 20 minutes before serving.


These cinnamon rolls are absolutely delicious and sure to become a staple for a special morning treat. The addition of the lemon extract to the dough and fondant really packs the flavor and makes these cinnamon rolls oh so delicious. If you are still looking for that perfect gift idea, I would highly recommend The Bread Baker's Apprentice cookbook. T and I have learned so much from it and have enjoyed making lots of wonderful bread recipes.

What are your holiday traditions?

Friday, December 21, 2012

Guinness Beef Stew

Occasionally, or maybe regularly depending on your own personal cooking tendencies, I like to spice things up in the kitchen by delving into international cuisines. T and I love to travel, and one of the most exciting things about leaving the good 'ol U.S.A. at least in my mind, is getting a chance to try authentic cuisine from other cultures. Unfortunately, it is not possible for us to spend the entire year traveling abroad, but on the other hand, it is fun to inject new cultural experiences into our everyday lives through the kitchen.


One of my favorite hobbies, besides cooking, is perusing the stacks at the local library. In addition to my usual mix of nonfiction and fiction writing, I LOVE to check out the cookbook section. It is so interesting to look through the pages of different cultural cookbooks and try to imagine what the flavor profiles of various areas of the world focus on. I would highly recommend seeking out the cookbook section of your local library - you might just be surprised by all the treasures you can find there, and it is a great way to try out a cookbook before deciding to purchase it.


When I found the recipe for Guinness Beef Stew in the Irish section of The Best International Recipe cookbook, I knew I had to try it. I've made plenty of dishes that include white or red wine in the ingredients, but using something as dark and heavy as Guinness had me intrigued. Luckily, most wine and spirits stores sell single bottles of Guinness, and I didn't have to buy an entire six pack. Whew! The only person I know who will regularly consume dark heavy beer like Guinness, besides on St. Patrick's Day, is my brother-in-law, who lives a solid 3 1/2 hours away. In this recipe though, it helps enhance the flavor and makes each hearty mouthful a delight to devour.

Recipe adapted from The Best International Recipe

GUINNESS BEEF STEW | Yield: 6-8 Servings | Time: 2 1/2 hrs.

INGREDIENTS:

3-3 1/2 lbs boneless beef chuck roast, trimmed of fat and cut into bite-sized chunks
2 Tbsp olive oil
2 medium onions, diced
1 Tbsp tomato paste
4 garlic cloves, minced
3 Tbsp flour
1 1/2 C low-sodium chicken broth
1 12 oz. bottle Guinness Draught
2 tsp dried thyme
3 bay leaves
1 Tbsp brown sugar
1 1/2 lbs. red potatoes, bite sized pieces
1 lb. carrots, bite sized pieces
3 Tbsp fresh parsley, minced
Kosher salt
Pepper

DIRECTIONS:

Preheat oven to 350 degrees. Season bite-sized chunks of beef with salt & pepper. In a large oven proof pot or dutch oven, heat 1 Tbsp olive oil over medium heat and cook 1/2 of meat 7-10 min. Remove cooked meat and juices to a bowl, and repeat with other half meat. Transfer cooked meat and juices to bowl.

NOTE: If your pot or dutch oven is large enough to cook all the meat at once, you do not have to do two separate batches.

Add 1 Tbsp olive oil to pot with diced onions and 1/4 tsp salt, stir occasionally 5-7 min. Add tomato paste and minced garlic, stirring for 30 seconds. Stir in flour, and cook 1 min. more.

Stir in broth, 1 1/4 C beer, thyme, bay leaves, brown sugar, and beef with juices. Bring to a simmer, cover and transfer to the preheated oven for 1 hr. 15 min.

Meanwhile, prep the potatoes and carrots. After 1 hr. 15 min., remove the stew from the oven, and add potatoes and carrots. Return to oven and cook an additional 45-50 min.

To serve, discard the bay leaves, stir in the remaining 1/4 C beer, season with salt and pepper, and stir in parsley.

Side suggestion: beer bread

My brothers will go on and on about this dish, and have convinced my mom that she needs to make it for Christmas Eve dinner this year. They have even gone so far as to state it is 'the best stew they have ever tasted'. Quite a compliment to the chef I would say!

What are your favorite recipes using beer?

Wednesday, December 19, 2012

Rosemary Olive Oil Bread

Ahhh...the scent of freshly baked bread. Don't you just love it? T and I have made it one of our 'kitchen projects' this year to learn to successfully make homemade bread. While T has taken the studied approach and read about all of the different components that are required to make a successful loaf of bread, I have taken the trial-and-error method to heart. So far, our greatest challenge has been trying to achieve the requisite amount of air pockets in ciabatta bread.


You would think that if you let the bread proof (otherwise known as rise), and the yeast is fresh and fully active, there would be no issues getting those delightful pockets of air. We, however, can't seem to make it happen, and have had a rough go at this. It seems that the best luck has come in the form of the non-traditional overnight rising rustic no-knead bread. When we've tried using a traditional recipe for ciabatta bread, we end up with no air pockets and what appears to the eye as French bread. By no means is this the end of the world, and it still tastes delicious, but it just means that the loaf doesn't look how it should on the inside.

Today, I was in the mood to try out a new bread recipe. I have made similar bread loaves using a no-knead method (to be blogged about another day), but I was busy running errands today and didn't think about making a fresh loaf until a few hours before dinner. An all-night proofing extravaganza just wasn't in the cards. Lucky for me, this bread is done in approximately two and half hours, and didn't throw any wrenches in my plan to have fresh baked bread to go with the Poblano Chicken Chowder I planned for dinner.


Step One: Gather the ingredients. It is important to use fresh yeast so that the bread will rise properly.


Step two: In large bowl, activate the yeast by mixing it with warm water. Also add sugar at this time. Tip: Warm the bowl first so that the heat from the water is used to activate the yeast instead of warming the bowl. Let sit for 10 minutes, add the spices, and mix together before adding flour.


Step three: The bread will need to rise twice. One hour in an olive oil coated large bowl, and after punching down and shaping, a second time for 45 min. on parchment paper covered with corn meal. Make sure to cover the dough while it rises to help trap the heat.

Recipe adapted from a hint of honey

ROSEMARY OLIVE OIL BREAD | Yield: 1 round loaf | Total Time: 2 hrs 30 min
(15 min Prep, 1 hr 45 min Proof, 20-25 min Bake)

INGREDIENTS:

1 C warm water (100-110 degrees)
1 Tbsp sugar
2 tsp active dry yeast
1 tsp kosher salt
2 Tbsp fresh rosemary, chopped (or 2 tsp dried)
1/4 tsp Italian seasoning (or pinch each of ground garlic, dried oregano, dried basil)
1/4 tsp freshly ground black pepper
2 Tbsp extra virgin olive oil
1 C whole wheat flour
1 C bread flour + extra for kneading
1 egg, whisked + 1 Tbsp water, for egg wash
dried rosemary, for sprinkling

NOTE: When guessing the amount of bread dough used for kneading, just keep adjusting until the dough no longer sticks to the sides, but is still tacky to the touch. I used almost an entire extra cup of bread dough to achieve this consistency. If your dough is too dry, you can add a little water.

DIRECTIONS:

In the bowl of stand mixer, combine warm water, sugar and yeast. Let sit 10 min to proof.

Stir in the salt, rosemary, seasonings, olive oil, and whole wheat flour. Using the dough hook attachment, add the bread flour a little at a time, until the dough forms a ball. Set mixer on medium speed for 5 minutes. Adjust flour or water as needed until dough no longer sticks to sides of bowl.

NOTE: If you don't have a stand mixer, you can also knead the dough by hand on a lightly floured surface for about 5 minutes.

Place the dough in a lightly oiled bowl; cover; and let rise until doubled in size, about 1 hr.

Punch down the dough and form it into a round loaf. Place it on a cornmeal dusted sheet of parchment paper; cover; and let rise until doubled in size, about 45 min.

Meanwhile, preheat oven (and baking stone) to 400 degrees. Once the dough has risen, gently brush the top with egg wash and sprinkle with dried rosemary.

Bake on preheated stone for 20-25 min until the top is golden brown and sounds hollow when tapped.

NOTE: If you don't have a baking stone, you can bake on a parchment paper lined baking sheet.


This bread is best eaten fresh, but can be double bagged and frozen. To reheat, wrap in foil and bake at 350 degrees. No need to thaw. The texture turned out light and fluffy and would be perfect for a sandwich or accompanying a great bowl of soup.

Do you have any favorite bread recipes?

Monday, December 17, 2012

Spicy Macaroni and Cheese with Veggies

The current destination I call home has a decent amount of snow on the ground, and the temps have dropped dramatically in the last week or so. I know, I know. I'm not exactly striving towards setting a happy tone here on this gloomy Monday morning. The ideal weather in my mind lies somewhere between 0% chance of snow, and 0% chance of the temperature falling below 70 degrees. Unfortunately, I live in the upper midwest, and the probability of my 'dream come true' weather is basically zilch. So, when I woke up on a recent morning to find temps in the low 20s and four inches of snow on the ground, I was left depressed about life craving some warm soul-soothing comfort food.


My idea of comfort food generally includes cheese, pasta and the familiarity of a great bowl of macaroni and cheese. While I enjoy the comfort of the occasional quick box of Kraft mac and cheese, my tendencies in the kitchen these days lean more towards the homemade version amped up with a little spice and lots of veggies. It's nice to know that I'm getting something healthy out of my bowl full of cheese and pasta. In my latest creation I opted to bring some heat to combat the cold of the outdoors.


I used freshly grated Wisconsin sharp cheddar cheese as the base and topping of this dish. If you prefer a different type of cheese, this recipe can easily be switched to include pepper jack, Swiss, Gouda or any soft or semi-soft cheese.

Recipe adapted from Life as a Strawberry


SPICY MACARONI AND CHEESE WITH VEGGIES | Yield: 6 servings | Total Time: 35 min.

INGREDIENTS:

1 lb. elbow macaroni
3 Tbsp butter
3 Tbsp flour
2 1/2 C skim milk
12-13 oz freshly grated cheddar cheese, divided (one brick)
1/2 tsp mustard powder
1/4 tsp cayenne pepper, plus 1/8 tsp for topping
1/4 tsp paprika, plus 1/8 tsp for topping
1/4 tsp black pepper
1/4 tsp kosher salt

Veggies (optional)
1/4 C green onion, chopped
3/4 C green pepper, chopped
2 jalapenos, chopped
2 roma tomatoes, chopped

NOTE: You can use any vegetables you have on hand. This recipe would also be good with spinach, zucchini, red onion, peas, parsley etc.

DIRECTIONS:

Preheat oven to 350 degrees. Cook pasta according to package directions in salted water until al dente. The pasta will continue to cook in the oven and soften up.

In a large oven-proof saucepan, melt butter. Whisk in flour to make a roux, and cook for 1 minute.

Whisk the milk into the roux a little at a time, making sure to work out all the clumps. Cook over medium heat until the milk has thickened, about 8 minutes.

Remove sauce from heat. Stir in 3/4 of the grated cheddar cheese (approx. 3 C) until cheese is melted. Stir in mustard powder, cayenne, paprika, black pepper and salt until combined.

Add pasta and chopped veggies into sauce, stir to combine. Sprinkle top with 1/8 tsp cayenne, 1/8 tsp paprika, and remaining cheese.

Bake at 350 degrees for 15-25 minutes or until cheese has melted and edges are crispy.


On a separate, but equally important side note...I did find the perfect bottle of wine to pair with this dish while gathering my ingredients at the grocery store. Enter: HandCraft Petite Sirah. Not only is it a full-bodied glass of deliciousness, it also says right on the label that it pairs well with Macaroni & Cheese. Bonus!

What are your comfort food favorites?

Wednesday, December 12, 2012

Braised Hoisin Beer Short Ribs with Sesame Snow Peas

With the end of the college football season, and a hubby that is still in the playoffs with his NFL Fantasy team, our household has been watching a great deal of football over the last several months. When we are unable to attend the actual game of our favorite team, what better to do than make it an all-day-football-watching-marathon? Thinking...thinking...thinking...


If you are like most women I know, you might view this as an opportunity to get some of the chores around the house done, or maybe go to the gym, or hit the mall for a quick dose of retail therapy. I, however, enjoy the occasional football Saturday at home, and took the opportunity to try out a new slow cooking recipe. When T heard that there was a possibility I might make ribs for him to devour, he perked right up and let me know what an excellent idea that was.

My experience with ribs has been relatively slim. I'm not a huge meat eater to begin with, and it seems that most ribs have so much visible fat on them that they aren't even appetizing to look at let alone eat. Therefore, my main reason for choosing to cook them at home had nothing to do with the fact that I like rib meat, but more to do with the fact that I had a large jug of hoisin sauce leftover from a stir-fry meal that I needed to use up. Hoisin, is basically the Chinese equivalent of American barbecue sauce. It's flavor is salty, sweet and spicy - similar to a teriyaki sauce. If you've ever thought of cooking with it before, go for it. The flavor it adds is delicious, and it is very easy to use. Short ribs, typically less fatty than standard ribs, are also relatively inexpensive and will pack the flavor with this recipe.


Gather the ingredients. Notice that I was using fresh ginger from our CSA. 
Fresh ginger at the grocery store has a tougher dry skin appearance. Ginger is usually 
available near the garlic and shallots in the produce section at most grocery stores. If you're 
unable to find fresh ginger, you can substitute 1 Tbsp minced ginger from a jar.


Brown the ribs on all sides, add remaining ingredients, and simmer on stovetop with the lid on 
for 2 1/2 hours. Transfer to the oven for the last hour of cooking. With 30 min left in the oven, 
start boiling potatoes and prepping snow peas. Wait to cook snow peas until 5 min before eating.

Recipe adapted from Food Network 

BRAISED HOISIN BEER SHORT RIBS | Yield: 4-6 Servings | Total Time: 3 hr 45 min

INGREDIENTS:

3 lbs beef short ribs, about 10 ribs
Salt and freshly ground pepper
3 Tbsp olive oil
10-12 garlic cloves, smashed
1-inch piece of ginger, peeled and cut into 1/4-inch slices
12 ounces good ale
3 Tbsp rice wine vinegar
1 C hoisin sauce

DIRECTIONS:

Season the ribs generously with salt and pepper. Heat olive oil in a large heavy pot with a lid (I used a dutch oven) over high heat. Brown the ribs on all sides, in batches if necessary. Remove the ribs and pour off all but a couple tablespoons of the rendered fat.

Return the pot to the stove, lower the heat to medium and saute the garlic and ginger for about 3 minutes. Add the ribs back to the pot. Add the beer and vinegar. Stir and then cover and simmer for 2 1/2 hours.

Preheat the oven to 300 degrees, and move pot or dutch oven to oven and continue cooking for 1 hour. (If you have a lot of fat, you can strain it off before moving to the oven.)

Serve with Mashed Yukons and Sesame Snow Peas.

NOTE: Depending where you live, short ribs may not always be pre-cut in the meat section of your grocery store. Ask the meat department, and they should be able to cut some for you. Bonus - short ribs are a relatively inexpensive cut of meat.

CREAMY MASHED YUKONS:
3 lbs Yukon gold potatoes, peeled
1/2-3/4 C Greek Yogurt (Healthy alternative to sour cream, and same great taste)
Salt and pepper
Chopped parsley (optional)

Boil potatoes until tender. Drain potatoes, return them to the pot, and mash with a hand masher. Add Greek yogurt until you reach your desired creaminess, and salt and pepper to taste. I also like to add fresh chopped parsley to my mashed potatoes for an extra kick of flavor if you have it on hand.

SESAME SNOW PEAS:
1 lb snow peas
2 Tbsp olive oil
1 Tbsp dark sesame oil
1 tsp sesame seeds
salt and pepper

Rinse the snow peas. In a large saucepan over medium-high heat, add the oils and heat. Add snow peas and saute until bright green, about 2-3 minutes. Season with salt and pepper, to taste. Sprinkle with sesame seeds and toss.


Overall response - Not only did this dish make our home smell absolutely delicious, when we plated up the short ribs, they were so tender that the the bones were literally falling off. The flavor of the sesame oil used in cooking the snow peas helped tie the entire meal together, and with two sides of veggies, and a pre-determined portion size of meat based on the way short ribs are cut, this meal ended up being pretty healthy. Now that's what I would call a success!

Monday, December 10, 2012

Radish & Kale Frittata with Tomato Basil Salsa

It's Meatless Monday time! Closing in on the end of the year, many CSA boxes are filled with an abundance of late fall and winter vegetables. People are continuously surprised when I tell them that our CSA continues well into December. It seems that many Midwestern gardeners don't think about, or don't consider, late fall/early winter vegetables when planning their gardens. Most tend to focus primarily on spring and summer vegetables because late season veggies are not as familiar, and aren't a staple on the dinner table.


Late season vegetable harvests include an abundance of root vegetables, and more hardy types of greens such as a variety of kales, spinach and cabbage. Some of the veggies found in our December CSA box:

Kale - Cabbage - Sweet Potato - Turnip - Parsnip - Celeriac - Sunchoke - Onion - Radish - Squash - Beet

It has been quite an experience cooking and tasting some of these veggies that we were unfamiliar with, and has left us feeling like maybe we've been missing out on some great winter vegetable treats. 


Beauty Heart Radish - white on the outside, red on the inside. Aren't they festive looking?!

Root veggies, grown underground, can store for an extended amount of time, and are more hardy than the seasonal vegetables of spring and summer. T and I have a theory that if we were to talk to some of the older generations, we might find that these vegetables used to be a much more common find on the dinner table. Before grocery stores became mainstream, and people started moving from rural to urban areas, many people planted their own vegetables to help sustain their families throughout the winter. The idea of having out-of-season vegetables readily available during the winter months was non-existant.

While I have nothing against being able to get tomatoes and zucchini in the middle of winter, it has changed the way we eat, and some of the yummiest late season vegetables and recipes have been left to collect dust - literally. If you've ever bought some of these less common root veggies, you will notice that they come with a heavy dose of wax covering. Not exactly what most cooks are looking for when buying fresh produce!

Recipe adapted from palate/palette/plate

RADISH & KALE FRITTATA | Yield: 6 servings | Total Time: 35 min.

INGREDIENTS:

1 medium bunch kale, sliced, thick stems removed
1 1/2 Tbsp olive oil
1 red onion, thinly sliced
5-6 medium radishes, thinly sliced (1-1 1/2 C)
8 eggs
1/2 C buttermilk
kosher salt
1 tsp crushed red pepper flakes
1/2 C crumbled feta cheese
1/3 C fresh basil, finely chopped

NOTE: I used Beauty Heart Radishes, which are larger than the standard radish, but any type radish is fine. Use a mandolin to get perfectly thin slices. 

TOMATO BASIL SALSA

2 medium tomatoes, diced (1-1/2 C)
1/3 C basil, finely chopped
1 Tbsp olive oil
Salt & Pepper to taste

DIRECTIONS:

Turn on oven broiler. Heat oil in a medium oven-proof skillet over medium. Add kale and onion, saute for 3 min. until softened. Add sliced radish and continue cooking for a few minutes until warmed through. (Radishes should still be mostly crisp.)

In a separate bowl, whisk 8 eggs with buttermilk, basil, feta, salt and crushed red pepper flakes. Pour into skillet and stir to allow the eggs to go over and around the veggies. Cover and continue cooking on stovetop for about 5 minutes, or until crust forms around the edges and the eggs are nearly set.

Transfer the skillet (removing the lid), to the oven, and broil 6-8 minutes until the eggs puff up and the top turns to golden brown.

Meanwhile, mix together the tomato basil salsa.

After 6-8 minutes, remove skillet from the oven and cool briefly. Cut into wedges, and serve warm with fresh tomato-basil salsa.


Not all CSAs have such a long season. Many end in October. T & I were lucky to find one that is well established and has a very long growing season. On that note, if you are in the La Crosse/Madison/Twin Cities area and want to check out a CSA for next year, I would highly recommend Harmony Valley Farm.

Friday, December 7, 2012

Banana Cinnamon Crumb Muffins

Top of the morning to you! Have you ever noticed how busy grocery stores can get on the weekends? I'm sure not every household works this way, but in my experience, the aisles tend to be the busiest on weekends when people have the most time to meal plan and cross off their grocery list for the week. That being said, by the end of the week, it can sometimes be a scramble trying to use up the fresh produce and fruit items that have a shorter shelf life.


Speaking of shorter shelf lives, this morning I found myself staring at three bananas gone ripe. Not beyond recognition, mind you, but spotty and squishy enough that the idea of peeling one for breakfast or an afternoon snack just wasn't very appealing. I pondered the idea of making the time-tested banana bread recipe that has been my go-to over the years, but in household of just T and I, we can never seem to get through the entire loaf, and I end up throwing half away.

Boy am I glad I decided to investigate new options! This Banana Cinnamon Crumb Muffin recipe was just the thing, and on top of being super easy, was absolutely delicious.

Recipe adapted from allrecipes.com

BANANA CINNAMON CRUMB MUFFINS | Yield: 12 muffins | Total Time: 35 min.

INGREDIENTS:

1 1/2 C all-purpose flour
1 tsp baking soda
1 tsp baking powder
1/2 tsp salt
3 bananas, mashed
1/2 C white sugar
1 egg
1/3 C oil (I used half olive oil, half vegetable oil. Whatever you have on hand is fine.)
1 tsp vanilla
1 tsp cinnamon
1/4 tsp nutmeg

CRUMB TOPPING:
1/2 C brown sugar
2 Tbsp all-purpose flour
1 Tbsp cinnamon
1 Tbsp butter

DIRECTIONS:

Preheat oven to 350 degrees. Lightly grease 12 muffin cups, or line with muffin papers.

In a large bowl, mix together flour, baking soda, baking powder and salt. Use a whisk to combine. In a separate bowl, beat together sugar, egg, mashed bananas, oil, vanilla, cinnamon and nutmeg. Stir the banana mixture into the flour mixture until just combined. Spoon the batter into prepared muffin cups.

In a small bowl, combine brown sugar, flour and cinnamon. Cut in 1 Tbsp butter and mix until crumbly looking. Sprinkle approximately 1-1 1/2 tsp of crumb topping mixture over each muffin.

Bake for 18-20 minutes, or until a toothpick comes out clean. Cool on wire rack and serve warm.


Do you have any favorite recipes that use bananas?