Wednesday, October 31, 2012

Roasted Pumpkin Seeds

Happy Halloween! I hope you all had a SPOOK-tacular day.


A highlight of T and I's first Halloween together was ... drum roll please ... Pumpkin Carving! I will say, T was more motivated to carve pumpkins than I was. He didn't have the opportunity to carve many pumpkins as a kid, and I had the advantage of carving pumpkins for many Halloweens growing up. It helps that I had younger brothers who kept the pumpkin carving festivities going so they could have their try at carving. I have fond memories of my dad laying out newspapers on the basement floor of the house I spent most of my childhood in, and telling my brothers and I that the knives were too sharp for us, but he would help us carve our pumpkins. Ahh...those were the days...


This year, T and I both had the idea of carving Hawkeye themed pumpkins. I was thinking ahead when I chose my pumpkin from the patch, and chose a nice small one. T is of the opinion that BIGGER is better, and chose a pumpkin about twice the size of mine. Therefore, it took him about twice as long to scoop out all of the pulp and get it carved. T opted for a tigerhawk, and I went for a Hayden. All in all, the night was a success.


T = Tigerhawk


N = Hayden

After we were done carving our pumpkins, T was very determined not to waste ANY of the pumpkin seeds he spent so much time scooping out, so he decided to try roasting them for a snack. 


Best. Decision. Ever. 

If it was just me, no way would I waste my time have the patience to separate the seeds from the pulp. I'm so glad one of us had the foresight to take the time. The roasted pumpkin seeds turned out absolutely delicious. Crunchy and salty with a little kick of spice. They are a great snack, and would also be excellent as a salad topper.


ROASTED PUMPKIN SEEDS | Total Time: 15-20 min.

INGREDIENTS:

Pumpkin Seeds (from carved pumpkin)
Olive Oil
Kosher Salt
Fresh Cracked Black Pepper

DIRECTIONS:

Preheat oven to 375 degrees. Separate pumpkin seeds from pulp. (Rinse with water to remove all pulp.) Toss seeds with olive oil to coat. Line a baking sheet with aluminum foil. Spread the pumpkin seeds on baking sheet and sprinkle with salt and pepper. Toast the seeds in the oven until lightly browned, about 15-20 minutes.


Monday, October 29, 2012

Birthday Chocolate Cake with Chocolate Buttercream Frosting

Happy Monday! How was your weekend? T and I kept very busy with a quick road trip to Chicago for the Iowa vs. Northwestern game, celebrating T's birthday, dinner with family and friends, and a scouting trip to find the perfect pumpkin carving tools so that we will be well prepared to carve our pumpkins for Halloween this week.


When I asked T about what type of cake he might like for his birthday weekend, his immediate response was 'chocolate'. Who am I to disagree with a man who wants chocolate!? I had a couple of ideas up my sleeve for chocolate cake recipes, particularly one that uses beets, but I stuck to the basics since I thought maybe a chocolate beet cake would be reaching too far out on a limb for a birthday cake. (One day I WILL make the chocolate beet cake, and I'll be sure to let you know how it turns out.) The recipe I decided on was a little out of my normal experience with chocolate cakes, and did use a secret ingredient...fresh brewed hazelnut coffee.


Mix up the batter.


Bake the cake.


Frost the cake.

Recipe adapted from Barefoot Contessa via Food Network 

Eat the cake!

BIRTHDAY CHOCOLATE CAKE | Yield: 8 servings | Prep: 30 min | Total Time: 1 hr 35 min.

INGREDIENTS:

Butter, for greasing the pans
1 3/4 C all-purpose flour
2 C sugar
3/4 C cocoa powder
2 tsp baking soda
1 tsp baking powder
1 tsp kosher salt
1 C buttermilk, shaken
1/2 C vegetable oil
2 extra-large eggs, at room temperature
1 tsp vanilla extract
1 C freshly brewed hot coffee

DIRECTIONS:

Preheat oven to 350 degrees. Butter and flour 2 8-inch round cake pans.

Mix together flour, sugar, cocoa, baking soda, baking powder, and salt into the bowl of an electric mixer fitted with a paddle attachment. Mix on low speed until combined. In another bowl, combine the buttermilk, oil, eggs, and vanilla. With the mixer on low speed, slowly add wet ingredients to the dry. Add in the coffee and stir just to combine, scraping bottom of the bowl with a spatula.

Pour batter into prepared baking pans and bake for 35-40 minutes, or until a tester comes out clean. Cool in the pans for 30 minutes, then turn out onto a cooling rack and cool completely.

Meanwhile, make Chocolate Buttercream Frosting.

CHOCOLATE BUTTERCREAM FROSTING

6 ounces good semisweet chocolate
2 sticks unsalted butter, at room temperature
1 extra-large egg yolk, at room temperature
1 tsp vanilla extract
1 1/4 C confectioner's sugar
2 tsp hot water

DIRECTIONS:

Chop the chocolate and place in a heat-proof bowl. Melt chocolate either over a pan of simmering water, or in the microwave following package instructions until just melted. Set aside until cooled to room temperature (about 15 min.).

In the bowl of an electric mixer fitted with a paddle attachment, beat the butter on medium-high speed until light and fluffy, about 3 min. Add the egg yolk and vanilla and continue beating for 3 min., scraping bowl as necessary. Turn the mixer to low, and gradually add confectioner's sugar, then beat at medium speed, scraping bowl as necessary, until smooth and creamy. On low speed, add 2 tsp hot water, and chocolate. Mix until blended, don't whip!

Place cooled cake on a cake pedestal or plate, frost immediately, and serve with a scoop or two of vanilla ice cream.

A tip on cake baking...learned from my kitchen: If you find that your cakes are turning out tall in the middle and short on the outsides (aka the domed effect), it is probably the pan you are using. The cake pans I used for this recipe are aluminum, and kept the heating even so that I didn't end up with domed cake. You can find them anywhere Wilton products are sold.

Birthday weekend cheering for the Hawks at Northwestern
Have you baked anything delicious lately?

Thursday, October 25, 2012

Cranberry Dream Scones

The other morning, I was tired of the regular old cereal routine, and wanted to try something new. I've always been a lover of fresh scones to go with my morning up of joe, but had never attempted them at home. I think I had the idea in my head that they are difficult to make, or I would need a special cast iron scone pan to help them set up properly and hold their shape. Not the case. Thankfully, I threw caution to the wind and decided to give it a go without any special tools, and little experience in pastry making. Scones, to my delight, are incredibly easy to make, and take hardly any time at all to throw together for a quick morning treat. As a bonus, these Cranberry Dream Scones are delicious without the added stickiness of frosting, glaze, or anything that would make them impossibly messy to eat.


Begin by mixing together the dough. After the dough is mixed, knead for 30 seconds, and shape into a 10x5 inch rectangle. Cut 8 evenly sized squares using a pastry cutter or knife, and place on an ungreased, or parchment lined baking sheet.


Preheat the oven to 425 degrees, and bake on the middle rack for 12-15 minutes, or until the tops are light brown.


Remove from the oven, and let cool on a wire rack for 10 minutes. 

Recipe from America's Test Kitchen Cookbook
Behold the perfect amount of crunchiness on the outside, and the delicious soft and fluffy inside.


CRANBERRY DREAM SCONES | Yield: 8 Servings | Prep: 10 min. | Total Time: 25 min.

INGREDIENTS:

2 C unbleached all-purpose flour
1 Tbsp baking powder
3 Tbsp sugar
1/2 tsp salt
5 Tbsp chilled, unsalted butter, cut into 1/4-inch cubes
1/2 C dried cranberries
1 C heavy cream

DIRECTIONS:

Preheat oven to 425 degrees. Adjust rack to middle position.

Place flour, baking powder, sugar and salt in large bowl, or food processor fitted with steel blade. Whisk together, or pulse six times.

If making by hand, use a pastry blender or your fingertips and quickly cut in butter until mixture resembles coarse meal, with a few slightly larger butter lumps. Stir in dried cranberries. If using a food processor, remove cover and distribute butter evenly over dry ingredients. Cover and pulse 12 times, each pulse lasting 1 second. Add cranberries and pulse once more. Transfer dough to a large bowl.

Stir in heavy cream with a rubber spatula or fork until dough begins to form, about 30 seconds.

Transfer dough and all dry, floury bits to countertop and knead dough by hand just until it comes together into a rough sticky ball, 5-10 seconds. Shape the dough into a 10x5 inch rectangle 3/4 inch thick, and using a pastry scraper or knife, cut into 8 squares. NOTE: You can make scones any shape you would like, just make sure they are 3/4 inch thick.

Place squares on ungreased baking sheet (or parchment lined), and bake 12-15 min or until scone tops are light brown. Cool on a wire rack for at least 10 minutes. Serve warm or at room temperature.

T and I both LOVED these scones, and I'll be keeping them in my box of go-to-recipes for quick holiday treats when company is in town.

Wednesday, October 24, 2012

Crash Hot Sweet Potatoes

This week in our CSA box we FINALLY received sweet potatoes. I've been slightly addicted to obsessed with sweet potatoes ever since they started popping up as a regular side option in mainstream restaurants. The orange crispy crunchiness of sweet potato fries got me to thinking that I should try to cook with them in my own kitchen and see what kind of deliciousness I could concoct.


After looking through MANY interesting ideas for how to cook with sweet potatoes, I landed on a delectable recipe for Crash Hot Sweet Potatoes.


First, wash and peel 2-3 sweet potatoes.


Next, slice them to about 1 1/2 inch thick. Coat with olive oil and roast in the oven at 375 degrees for approximately 40 min., or until soft enough to smash. Flip potatoes halfway through the roasting time for even cooking.


Mix up the spice rub while the sweet potatoes are roasting.


Remove sweet potatoes from the oven, drizzle with olive oil, and rub in spices. Do this on both sides. Roast for 15 min. then flip and roast another 10 min.
Wa-Laa! Crunchy and spicy on the outside, sweet and soft on the inside. Absolutely amazing.

Recipe adapted from dlyn

CRASH HOT SWEET POTATOES | Yield: 2 Servings | Prep: 10 min.  | Total Time: 45 min. to 1 hr.

INGREDIENTS:

2-3 Sweet Potatoes, peeled and sliced an inch and half thick
Olive Oil

Spice Rub:
1 1/2 Tbsp brown sugar
1/2 tsp kosher salt
1/2 tsp ground cumin
1/2 tsp chili powder
1/2 tsp paprika
1/4 tsp onion powder
1/4 tsp chipotle chili powder
1/4 tsp pepper
1/8 tsp garlic powder

DIRECTIONS:

Preheat oven to 375 degrees. Peel and slice sweet potatoes 1.5 inches thick. Toss with olive oil to coat. Place on an aluminum foil lined baking sheet and roast, flipping once, for 35-40 minutes or until soft enough to flatten.

Meanwhile, mix together spice rub.

Remove sweet potatoes from oven once soft enough to flatten, and using a glass bowl or heavy glass, flatten sweet potatoes into disks. Drizzle with olive oil and rub with spice rub on each side. Return to oven and bake 15 min. then flipping and bake another 10 min. until they have a crust from the caramelization of the sugar and spices.

NOTE: To speed up the process, boil 2 quarts of water with 1/2 tsp salt and add sliced potatoes for 10-12 min. Remove from water, cool for 10 minutes, then smash potatoes. Continue with main recipe instructions for spice rub and roasting times.

T thought these little bites were so delicious that they tasted like something you would find on the menu at a fancy restaurant! I would have to agree. The spices used during roasting enhanced the natural flavors of the sweet potatoes, and the finished product was just simply amazing. Enjoy!

Monday, October 22, 2012

An Organic Farm Tour

Tractor ride through the fields at Harmony Valley Farm

On a recent Sunday this fall, T and I went on a farm tour of Harmony Valley Farm, an organic farm in Viroqua, WI where we participate in a CSA. Joining a CSA (Community Supported Agriculture) program has been an amazing experience, and provided us with ultra fresh, seasonal, organic produce on a weekly basis for the Spring, Summer, and Fall growing seasons. We have been eating more healthy than we otherwise would, and have had lots of fun trying new vegetables, researching new recipes, and learning about the benefits of eating organically.

At Harmony Valley Farm
Brussel Sprouts 
Tomatillos
Curly Kale
Mini Sweet Peppers 
Lettuce Fields
Sweet Potatoes 
Some of the vegetables we have received in our CSA box have pushed the boundaries of our comfort zones, and given us the opportunity to expand our food knowledge. Some of the new veggies we've tried include beets, kale, turnips, celariac, swiss chard, broccoli romanesco, eggplant, baby bok choi, tomatillos and mini-sweet peppers. So far, we have been able to find delicious recipes to make, and have had a lot of fun trying both the new vegetables, and also some more familiar ones like spinach, carrots, potatoes, garlic, onions, celery, cauliflower, broccoli, winter squash, watermelon, cantaloupe, sweet corn, edamame, green beans, cucumbers, zucchini and summer squash.

The Perfect Pumpkin
Beautiful Scenery
Happy Pigs!
Eating fresh, organic, locally grown produce has been a real adventure, and a ton of fun to learn about where the food on our plates is coming from. If you are interested in learning more about becoming part of a CSA and would like to find a farm near you, check Local Harvest for a wealth of information on the topic and a great search tool to find a CSA in your area. Do you have suggestions on where to find recipes for seasonal cooking?

Friday, October 19, 2012

Poblano Chicken Chowder

Happy Friday! How has your week been? I have kept busy this week planning menus and researching new recipes to try with the latest vegetable haul from our CSA (Community Supported Agriculture) box. It's nice having so many different veggies on hand to choose from, and always makes dinnertime something T and I look forward to.

With the week coming to a close, and a new CSA box to pick up going into the weekend, I was looking for a recipe to use up our poblano peppers when I stumbled upon this delightful Paula Deen recipe for Poblano Chicken Chowder. Paula's original recipe makes 12-16 servings, but since my household is only 2 people, I decided to cut the recipe in half and made some modifications to make it my own.

Recipe adapted from Food Network

POBLANO CHICKEN CHOWDER | Yield: 6 Servings | Prep: 30 min. | Total Time: 1 hour

INGREDIENTS:

1/8 C olive oil
3 large carrots, cut into 1/4-inch dice
1 large onion, diced
3 stalks celery, cut into 1/4-inch dice
5 cloves garlic, minced
5 poblano peppers, seeded and cut into 1/2-inch dice
1/2 tsp salt
1/2 tsp white pepper
1/4 tsp ground cumin, or more to taste
1/4 tsp dried thyme, or more to taste
1 Tbsp chicken bouillon granules
1 1/2 quarts chicken broth (6 C)
1/4 bunch fresh cilantro leaves, minced
1 1/2 C diced grilled chicken (about 2 breasts)
1/4 C unsalted butter
1/2 C all-purpose flour
1/2 tsp hot sauce, or more to taste
1/2 C half & half

DIRECTIONS:

Heat oil in large stockpot over medium heat. Add carrots, onions, celery, garlic, poblano peppers, salt, white pepper, cumin, and thyme. Saute 7-8 min., or until the vegetables begin to soften.

Stir in chicken bouillon. Add chicken broth and cilantro, and cook 10-12 min, or until carrots are tender. Meanwhile, grill and dice chicken.

Add chicken and cook, stirring frequently, until chowder is thick and chicken is heated through.

In a small saucepan, melt butter over medium heat. Add flour and stir to combine. Cook, stirring frequently, for 3-4 minutes to cook the flour. Don't allow to brown. Ladle 1/2 C of hot liquid from the stockpot into the saucepan, whisking constantly.

When the first 1/2 C is incorporated, add another 1.5-2 C of liquid, 1 C at a time. Pour the mixture in the saucepan into the stockpot, whisking to blend. Cook, stirring frequently, 3-5 min longer, or until the mixture begins to thicken.

Just before serving, stir in hot sauce and half & half.

This recipe was absolutely delicious, and can be modified for your individual tastes. T and I both enjoy some heat in the kitchen, and I had many poblanos to use, so my version turned out quite spicy. I also increased the veggie count of the carrots and celery - I can never seem to get enough! I'm a sucker for the divine flavor boost and health benefits of garlic, so I usually error on the side of more is better. You could also try adding corn, pearl onions or red peppers to make an extra hearty version. My only regret is not making the full recipe so that I would have some in the freezer to pull out later!

Tuesday, October 16, 2012

Blueberry Buttermilk Coffee Cake

Growing up, I was deprived did not have the opportunity to indulge in fresh blueberries. I am not complaining, I had MANY other amazing breakfasts - Thanks Mom! - but fresh blueberries very rarely, if ever made the breakfast table. I had quite a few of the freeze-dried type that came in the pre-mix muffin packages, but fresh blueberries were scarce. Thankfully, I was introduced to them several years ago by my wonderful hubby, who would eat blueberries for every breakfast if I let him. It has taken me a while to open up to them - I'm still not crazy about eating them plain - but I do love fresh blueberries in a bowl of oatmeal, or in homemade baked goods.
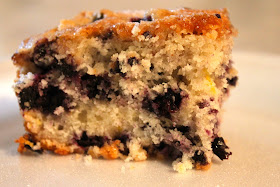
Enter: Blueberry Buttermilk Coffee Cake. Also known as...the best melt-in-your-mouth deliciously moist breakfast cake I have ever made.

Recipe via alexandra's kitchen

BLUEBERRY BUTTERMILK COFFEE CAKE | Yield: 6-8 Servings | Prep: 10 min. | Total Time: 50 min. - 1 hr.

INGREDIENTS:

1/2 C unsalted butter, room temperature
2 tsp lemon zest - from 1 large lemon
3/4 C sugar
1 egg, room temp
1 tsp vanilla
1 3/4 C flour + 1/4 C (used to toss with blueberries)
2 tsp baking powder
1 tsp kosher salt
2 cups fresh blueberries (or substitute 1 pkg frozen blueberries)
1/2 C buttermilk

1 Tbsp sugar (for topping)

DIRECTIONS:

Preheat oven to 350 Degrees. In a large bowl, cream butter, lemon zest and 3/4 C sugar until light and fluffy. Add egg and vanilla and beat until combined.

Whisk together 1 3/4 C flour, baking powder and salt. Add the flour mixture to the batter, alternating with the buttermilk.

In a separate bowl, toss blueberries with 1/4 C flour. Fold into the batter mixture.

Grease a 9x9 baking dish, and spread batter in pan. Sprinkle batter with remaining 1 Tbsp sugar. Bake for 40 min., or until tester comes out clean (may take up to 50 minutes). Let cool for 15 min. before serving.

Monday, October 15, 2012

Weekend Highlights

My weekend was busy busy! T and I road tripped to Okoboji to enjoy one of the last warm weekends of fall weather. Although most of the leaves had already fallen off the trees, it was fun to see the lake one last time before winter arrives. We couldn't have asked for better weather! It was 70 degrees and sunny on Saturday, and we were able to get outside for a while, go on a walk and enjoy the day.

Just a little mid-October getaway to Okoboji...


We were sad to see the hoists already in the yard. We couldn't believe how low the water is! It looks to be about 2 feet lower than usual. We now almost have a beach!


Happy the dock was still in!


The weather at the lake was a drastically better than our other potential weekend plans to road trip to East Lansing, MI where it was about 40 degrees and rainy at the Iowa vs. Michigan State game. We enjoyed watching the game from the couch indoors, but still agree that it is more fun to be at the game instead of watching from afar.

Hawks win in double overtime at Michigan State! 19-16 (2OT)

via 
We're looking forward to the back half of the 2012 Iowa Hawkeye football season, and trips to Iowa City to cheer on and celebrate more Hawkeye victories! Next up, Iowa vs. Penn State under the lights at Kinnick this coming weekend! Go Hawks!

Wednesday, October 10, 2012

Beef & Pumpkin Stew

Fall is in the air. Don't you just love this time of year?!? Here in Wisconsin, the temps have dropped, the trees have turned, and the crunch of leaves is abundant. As the days get shorter, I find myself craving hearty soups and stews to ward off the chill of the outdoors.

On a recent trip to the grocery store, T - my other half - spotted the most adorable little mini pumpkin in the produce section. Labeled with the perplexing name of Pie Pumpkin, I caved and let him talk me into it. I'm a sucker for cute tiny things. On another note, does anyone know someone who actually takes the time to make pumpkin pie out of a Pie Pumpkin instead of just purchasing a can of pumpkin ready to go? ME EITHER. So, with not an idea in mind of what to do with this Pie Pumpkin, I set off to find a recipe.

Behold: Beef & Pumpkin Stew ... slow cooker style ... Oh Yeah. I had a lot of fun making this dish since it included cooking with new ingredients I'm not used to - couscous, pumpkin, cinnamon stick. I was also excited because I'm new to slow-cooking, but prefer the classed up edition without all the cream soups and high sodium, and this recipe definitely has a flair for gourmet.

Recipe via Williams Sonoma The New Slow Cooker

BEEF & PUMPKIN STEW | Yield: 6 Servings | Prep: 30 min. | Total Time: 8 hrs

INGREDIENTS:

3 lb. chuck roast, cut into 1 inch chunks
Salt & freshly ground pepper
2 Tbsp. olive oil
1 yellow onion, finely chopped
2 sprigs fresh thyme
3 bay leaves
4 cloves garlic, chopped
1 cinnamon stick
1/3 C. dry red wine
2 Tbsp. + 1 tsp. red wine vinegar
2 large carrots, peeled and cut into chunks
1 can (15 oz) diced tomatoes, drained
1/3 C. beef or chicken stock
1 lb. pumpkin or butternut squash, peeled, seeded, and cut into 1 inch chunks
2 green onions
1 Tbsp. chopped fresh mint
Couscous, for serving

DIRECTIONS:

Season the beef chunks generously with salt & pepper. In a large frying pan over medium-high heat, warm 1 Tbsp olive oil. Add beef and saute until golden brown on all sides approx. 8 min. total. 

Transfer beef to plate using slotted spoon.

Pour off most of the fat from the pan, and return to medium-high heat. Add the onion, thyme sprigs, and bay leaves and saute until the onion begins to brown approx. 6 min. Add the garlic and cinnamon and cook for 1 min. more. Pour in the wine & 2 Tbsp. vinegar and stir to dislodge any browned bits on the pan bottom. Transfer the contents of the pan to a slow cooker and stir in the carrots, tomatoes, and stock. Add beef, cover, and cook on the low setting 5 hours.

Scatter the pumpkin over the top of beef, re-cover, and continue to cook for 3 hours.

In a small bowl, whisk together the remaining 1 Tbsp. olive oil, 1 tsp. vinegar, 1/4 tsp. salt, and several grinds of pepper. Stir in the green onions and mint.

Cook couscous as directed.

Serve stew in bowl over couscous topped with green onion mixture.

Both T and I loved this dish with it's clean, crisp fall flavors. We will be cooking with pumpkin and couscous more often!

Tuesday, October 9, 2012

Welcome!

Welcome to the blog. The hubs has been urging me to start writing for a while, and today is the day! Get excited! The decision to start a blog and then finding an available name has been quite the process. How to choose the platform, layout, fonts, colors, backgrounds, etc. has been fun exhausting, and I will probably change my mind and re-arrange the entire format as I get further in. 

The main focus will feature our travels and everyday adventures, both in the kitchen, and otherwise. I look forward to sharing pieces of our life and our many adventures.